How to Create a Custom Object in Salesforce
Quick introduction:
Have you ever felt that Salesforce was missing a particular piece of data you needed to track? This is where custom standard objects come in! As a Salesforce user, they enable you to personalize the platform to your organization’s specific needs.
Here, we will look at how to create a custom object in Salesforce. A custom object helps keep your data structured and accessible. By the end, you’ll have a good grasp of custom objects and the confidence to create your own.
A Step-by-step Guide on How to Create a Custom Object in Salesforce
Step 1: Access the Object Manager Page
- First, log in to your Salesforce account and select the Setup menu (it looks like a gear icon in the top right corner).

- From the Setup menu, select Object and Fields under platform tools. Then click on the Object Manager tab.
Step 2: Create Your Custom Object

- Once in the Object Manager, click the Create button in the upper right corner and choose Custom Object.

- Next, click on ‘Click here to open this page in Salesforce Classic’.
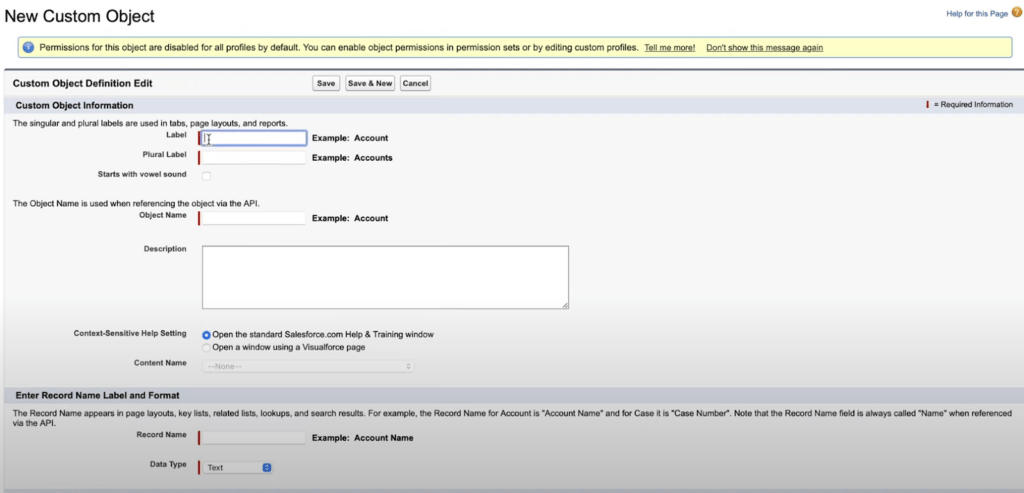
Step 3: Fill in the Details

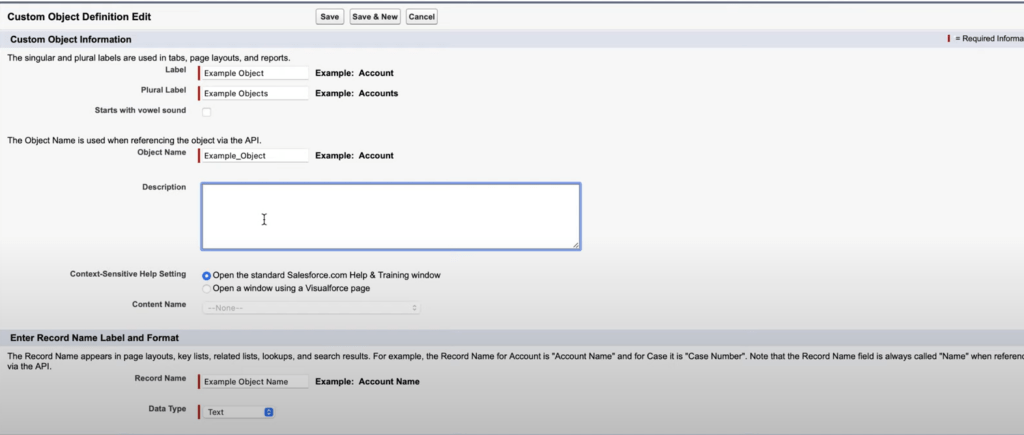
- In the Label box, provide a clear and descriptive custom object name for your item. For example, if you’re constructing a standard object to monitor customer support tickets, you may name it “Support Ticket.”
- The Plural Label box automatically defaults to the plural form (e.g., “Support Tickets”).

- Now the object name will auto-fill. Then enter the description for the first custom object.
- Finally, fill in the record name label and the data type of your custom object.
Step 4: Save and Customize (Optional)

- When you’re finished customizing your object’s name and label, click Save. This builds a simple custom object.
Tips & Tricks
- After you’ve created your object, you may add custom fields to collect specific data points that are pertinent to it.
- Consider the relationships between your custom item and other Salesforce objects.
- Salesforce provides a range of field types for capturing different sorts of data. Consider alternatives such as text fields, numeric fields, and date fields.
- Leverage Salesforce automation to streamline processes related to your custom object.
- Maintain data accuracy by adding validation rules to your custom fields.
Conclusion
Custom objects in Salesforce allow you to expand its functionality. They may be adjusted to your organization’s specific requirements. To build custom objects in Salesforce, follow these steps. Custom objects can help you handle data more efficiently. They may also achieve new levels of efficiency within Salesforce.
Create a custom object tab that accurately represents your unique data. Remember to use custom fields to meet your needs. Consider automation for more efficiency. Use validation rules to ensure data cleanliness. These features enable you to personalize Salesforce to your organization’s particular requirements.


