
How to create a CRM in Excel
Quick introduction:
As a small company owner, you realize the value of building client connections. Maintaining a solid connection with your clientele from the start is crucial. This link is critical for increasing sales and ensuring long-term success. As your firm grows, you may need to search for more complicated tools than notepads and spreadsheets. Here’s where a Customer Relationship Management (CRM) system comes in.
A CRM system is a powerful tool that simplifies client relationship management. It acts as a centralized store for all consumer data. It lets you monitor sales funnels, manage communications, and provide valuable insights into consumer behavior. Using a CRM increases sales efficiency, increases customer satisfaction, and generates business development.
Benefits of Creating a CRM in Excel
While specialist CRM software provide comprehensive features, they come with a cost. The initial expenditure may be too expensive for small enterprises. This is where Microsoft Excel is a feasible option.
Excel provides various benefits for creating your own CRM system:
- Most individuals have a rudimentary comprehension of Excel. This makes Excel an easy-to-use platform for creating and administering a CRM. This reduces the need for significant training, allowing you to start immediately.
- Microsoft Excel is available on most PCs, and many firms already have subscriptions that include Excel. Free solutions, such as Google Sheets, are also available. This removes the additional cost of obtaining specific CRM software.
- Excel provides remarkable versatility. You may customize your CRM spreadsheet to meet your unique business needs. You can also monitor individual client interactions and prioritize sales funnels.
- Excel interacts with other Microsoft Office products, such as Word and Outlook. This allows you to build a customer management system. It is a comprehensive system that takes advantage of the capabilities of numerous technologies.
Step-by-step Guide on How to Create a CRM in Excel
Step 1: Planning Your Excel CRM
Building a great Excel CRM takes meticulous planning and organization. This section will take you through the necessary processes.
It will help you establish the groundwork for your customer relationship management system.
Define Your Objectives
The first step is to determine your CRM objectives. What do you want to achieve by creating this system? Here are some common CRM goals for small businesses:
- Monitor and manage possible customer contacts. This helps to move leads through the sales cycle and boosts conversion rates.
- Centralized client data allows for more tailored contact and fosters deeper connections.
- Track sales funnels, evaluate progress, and find opportunities for improvement.
- Customer data may provide significant information to help businesses plan their initiatives.
- Once you’ve identified your key objectives, you can tailor your Excel CRM to address those specific needs.
Identifying Key Data Points
The effectiveness of your CRM hinges on capturing the correct customer data. Here are some essential data points to consider as an example:
| Category | Description | Example Data Points |
| Contact Information | Central repository for all customer contact information | Name, email address, phone number, physical address, website (if applicable) |
| Company Details | Store details about your client organizations | Company name, industry, size, website |
| Sales Data | Tracks the progress of potential deals | Sales stage (lead, opportunity, closed deal), purchase history, product/service interests |
| Communication Logs | Records interactions with customers | Record interactions with potential customers: emails, phone calls, meetings. |
| Custom Fields | Define additional data fields specific to your business needs | Customer preferences, product registration information, dietary restrictions (for restaurants) |
By capturing this information, you will comprehensively understand your customer base. This understanding will allow you to personalize communication and tailor your sales approach.
Step 2: Designing Your Spreadsheet Structure
Here’s a step-by-step guide to organize your Excel CRM for optimal data management:
Step 2.1: Dedicated Sheets (Separate Your Data)
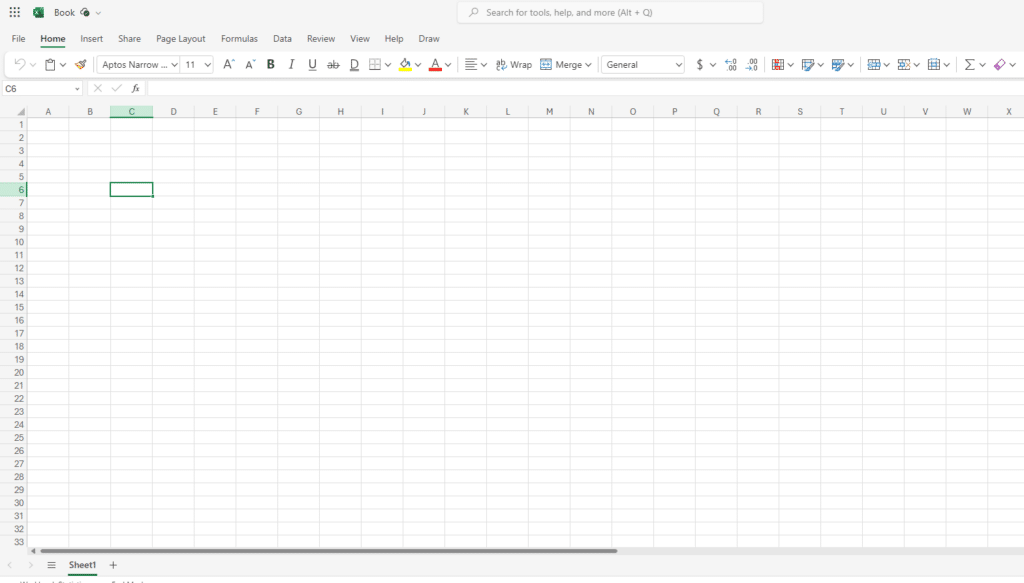
- Open your Excel workbook.

Source: Screenshot
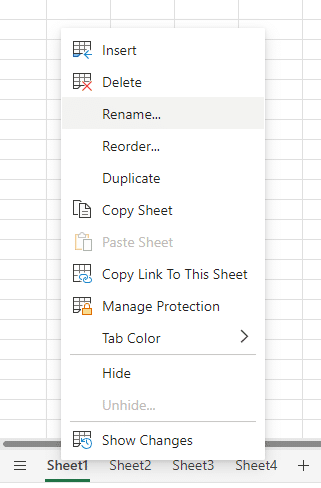
- Click the “+” tab at the bottom right corner to add a new sheet.
Source: Screenshot
- Rename the sheet to reflect its data category (e.g., “Contacts”).

Source: Screenshot
- Repeat this process to create separate sheets for:
- Companies
- Sales Pipeline
- Communication Logs
Step 2.2: Data Validation (Ensure Accuracy)
Source: Screenshot
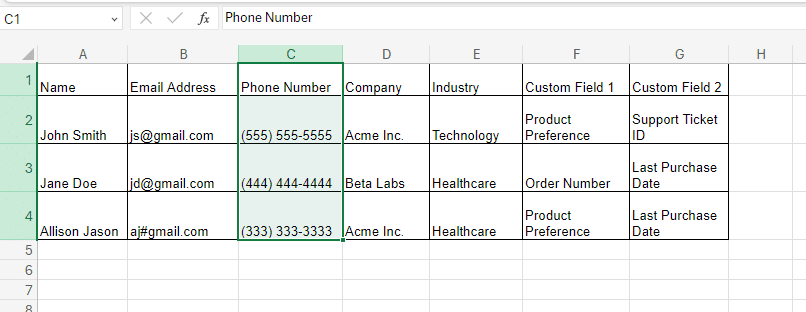
- Select a specific column where you want to enforce data restrictions (e.g., the phone number column in the Contacts sheet).

Source: Screenshot
- Navigate to the “Data” tab on the top menu bar.
- In the “Data Tools” section, select “Data Validation”.
Source: Screenshot
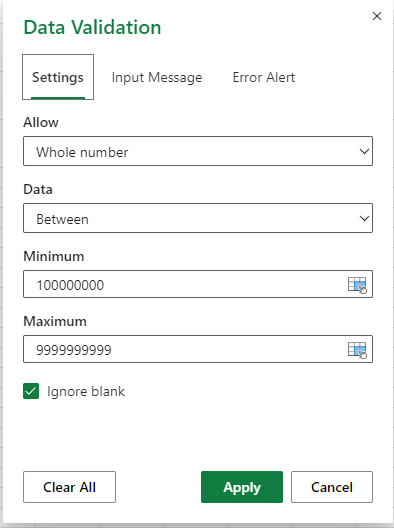
- In the “Data Validation” window
- Under the Allow dropdown, select “Whole number” and choose between for the data dropdown.
- Since it should be a phone number you can set a minimum and maximum value.
- Click “Apply” to save the data validation rule.

Source: Screenshot
- Now as you input any data under the phone number it will always check for the rules set. As you can see you will get a warning for cells that do not match the criteria.
- Repeat this process for other columns where you want to restrict data types (e.g., phone number format).
Step 2.3: Dropdown Menus (Simplify Data Entry)

Source: Screenshot
- Select the cell where you want the dropdown menu (e.g., the Industry in the Contacts sheet).

Source: Screenshot
- Go to the “Data” tab on the top menu bar.
- In the “Data Tools” section, select “Data Validation”.
Source: Screenshot
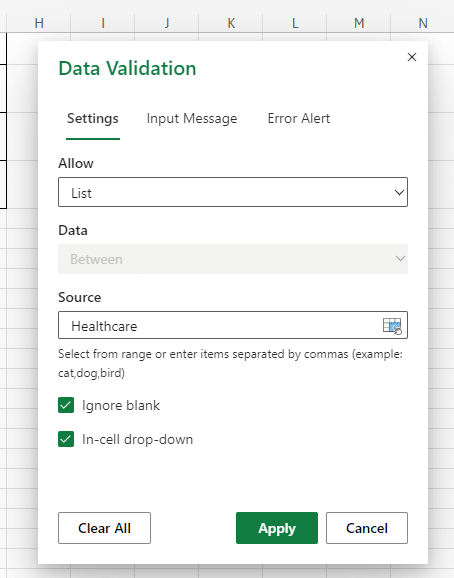
- In the “Data Validation” window:
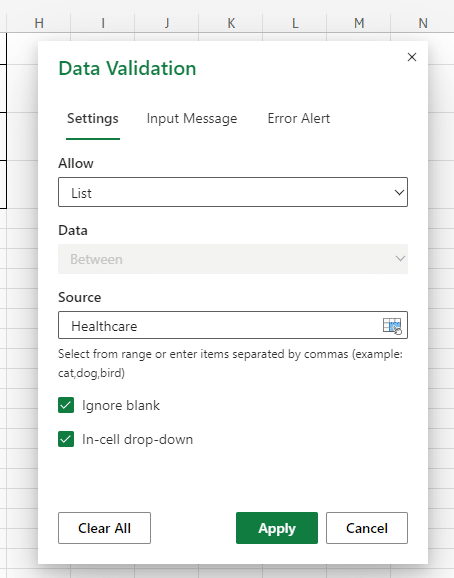
- Choose “List” from the “Allow” dropdown menu.
- In the “Source” field, type the list of options you want users to choose from (e.g., “Technology,” “Healthcare”).
- Click “Apply” to save the dropdown menu options.
- Repeat this process for other columns with pre-defined categories.
Step 2.4: Conditional Formatting (Highlight Key Info)

Source: Screenshot
- Select the range of cells you want to format based on specific criteria (e.g., the “Company” column in the Contacts).

Source: Screenshot
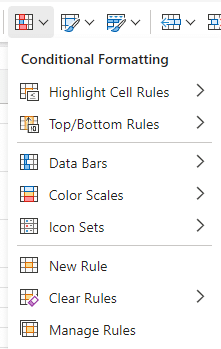
- Select the “Home” tab from the navigation bar at the top.
- In the “Styles” section, select “Conditional Formatting”.
Source: Screenshot
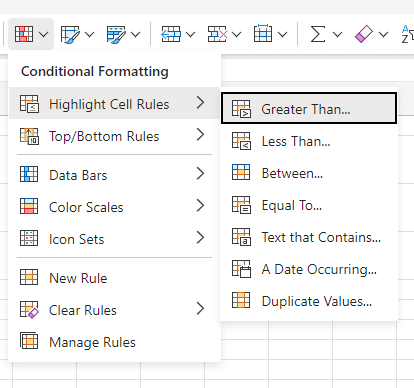
- Choose a formatting rule based on your needs. For example, to highlight upcoming deadlines:
Source: Screenshot
- Select “Highlight Cells Rules” > “Text that Contain”
Source: Screenshot
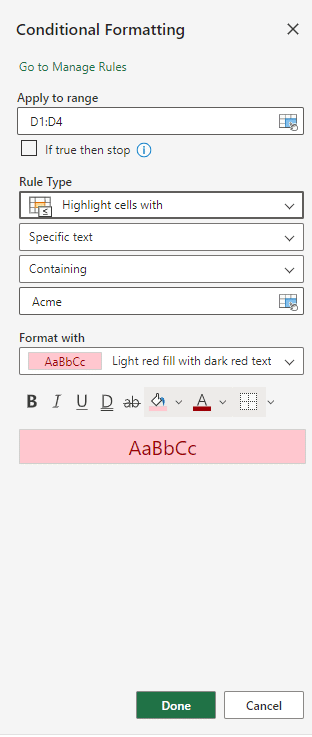
- In the value field, enter the company name (this highlights cells with the specific name).
- Choose a desired formatting style (e.g., red fill color) for easy identification.
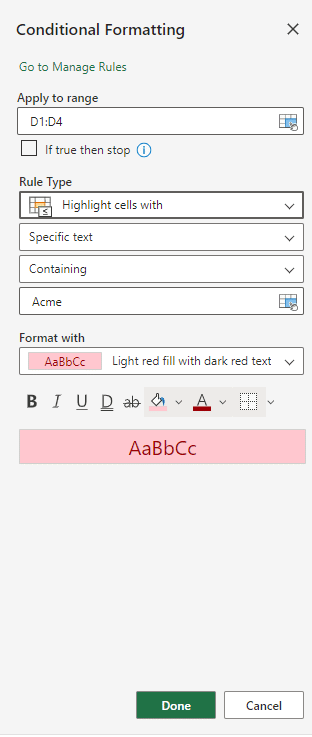
- Click “Done” to apply the conditional formatting rule.

Source: Screenshot
- As you can see the cells that contain Acme will turn red.
- You can create additional rules for other scenarios.
Following these steps will establish a well-organized foundation for your Excel CRM. This will promote data accuracy, streamline data entry, and emphasize critical information.
Step 3: Data Collection and Organization
Having established your CRM’s objectives, data points, and basic structure, it’s time to focus on collecting and organizing your customer information. This stage lays the foundation for a robust and reliable CRM system.
Step 3.1: Setting Up Data Entry Forms
This method utilizes a separate sheet for entering new customer data. You can customize the form by adding labels, text boxes, and dropdown menus for each data point. This ensures consistency and reduces errors during data input.
Here’s how to create a basic data entry form:

Source: Screenshot
- Navigate to a new sheet in your Excel workbook.
- Label each column with the corresponding data point (e.g., Name, Email, Company).
Source: Screenshot
- Utilize data validation to restrict data types in specific columns (e.g., email address format for the email column).
Source: Screenshot
- Implement dropdown menus for used data points like sales stages or customer categories.
- Once the form is complete, you can copy and paste the captured data into your designated data tables.
Step 3.2: Structuring Data Tables
Organize your customer information into concise, well-structured tables. Each table should concentrate on a specific category, such as Contacts, Companies, or Sales Pipeline. Here are some important considerations:

Source: Screenshot
- Headers: Label each column heading with the matching data point.
- Data Types: To guarantee accurate formatting and calculations, assign suitable data types to each column (for example, text, numeric, and date).
- Sorting and filtering: Use Excel’s sorting and filtering functions to organize and find specific data points.
Step 3.3: Implementing Data Validation
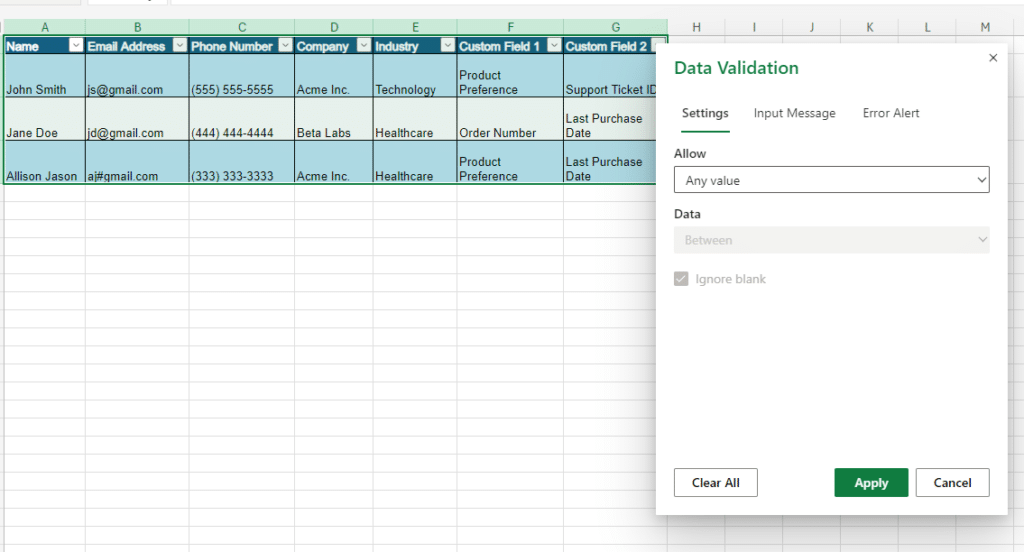
Maintaining correct and consistent data is critical for successful CRM use. Excel’s data validation capabilities enable you to impose particular criteria for the kind of data entered in each column. Here are some often-used data validation rules:
Source: Screenshot
- Data Type: Limit data entry to one type, such as text, integer, or date.
- Criteria: Set criteria for acceptable numbers within a range or according to a given list.
- Input Message: Set a custom message to show when incorrect data is input.
Implementing data validation can help you decrease mistakes during data entry. This protects the security of your customers’ information.
Step 4: Building CRM Functionalities
Now that you have a well-structured foundation for your Excel CRM, we can explore how to add functionalities. These functionalities will enhance the usability and effectiveness of your Excel CRM.
Step 4.1: Creating Contact Management Features
Source: Screenshot
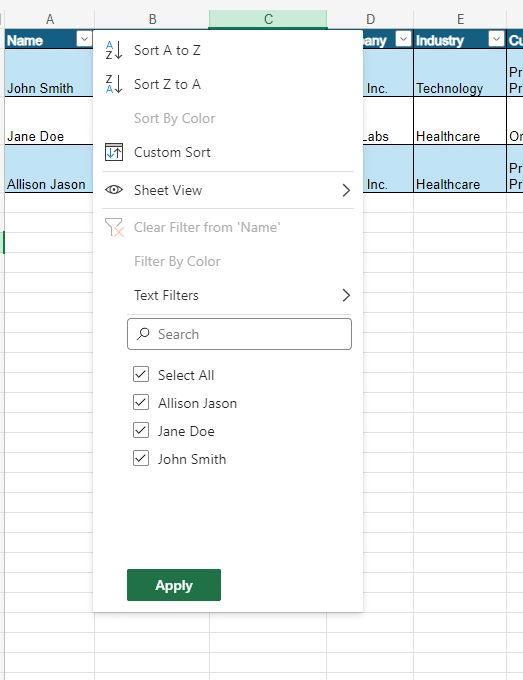
- Use Excel’s filtering capabilities to look for contacts. Filter connections using particular parameters such as name, business, or industry. This helps you to find important consumer information.
Source: Screenshot
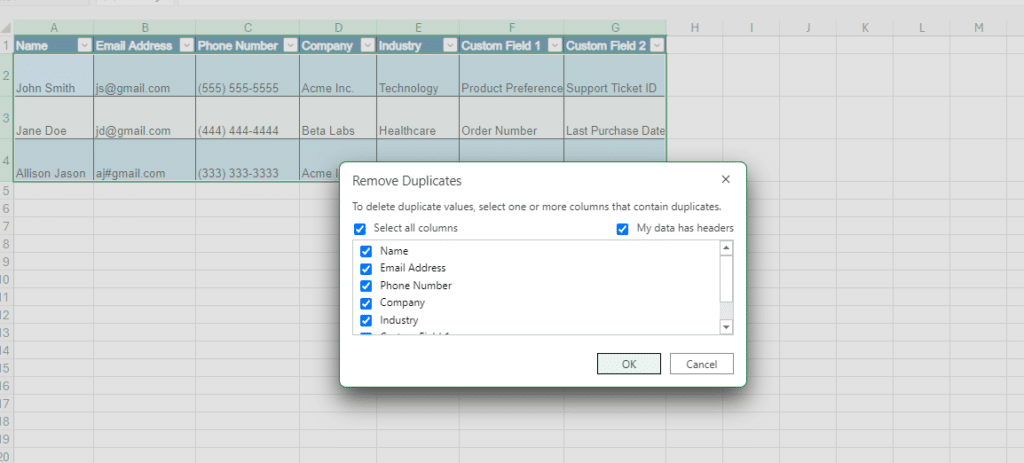
- Over time, duplicate entries might accumulate in your CRM. Use Excel’s duplicate elimination capabilities to detect and combine duplicates, assuring data accuracy.
Step 4.2: Developing Task and Appointment Tracking
- Integrate a task management system within your CRM. This could involve adding a dedicated sheet for tasks. It would include details like due dates, priorities, and assigned team members.
- Link your CRM to your calendar application. This will enable seamless appointment scheduling with customers and prospects.
- Use Excel’s conditional formatting to highlight upcoming deadlines. Use Excel’s reminder features for tasks. Ensure timely follow-up with customers by using these features.
Step 4.3: Integrating Communication Tools
- Use Excel’s mail merge tool to create tailored email marketing for specific consumer segments. This increases communication efficiency and saves time.
- If you utilize a third-party email service provider, look into add-ins and connectors. Use them to monitor email openings and clicks in your CRM spreadsheet.
By adopting these features, you may improve your Excel CRM. This will help you handle consumer contacts more successfully. It will also make your sales process more efficient.
Step 5: Automating and Customizing Your Excel CRM
This guide explores techniques for streamlining your CRM. It focuses on saving time through automation and customization within Excel.
Step 5.1: Utilizing Formulas and Functions (Automate Calculations and Data Analysis)
VLOOKUP
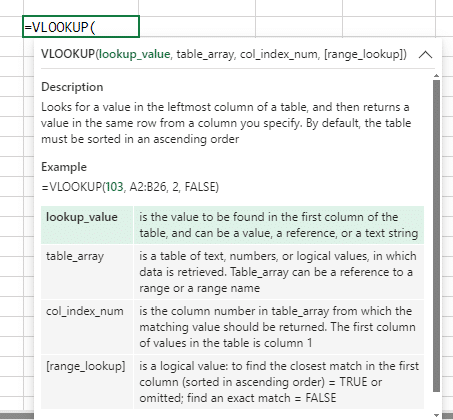
- Locate the data you want to retrieve (e.g., customer email addresses in the Contacts sheet).
Source: Screenshot
- In your target sheet (e.g., Reports sheet), enter the VLOOKUP formula:
- =VLOOKUP(lookup_value, table_array, col_index_num, [is_sorted])
- Replace “lookup_value” with the value you want to match (e.g., customer name from the Reports sheet).
- Replace “table_array” with the cell range containing the data you want to retrieve (e.g., entire Contacts sheet).
- Replace “col_index_num” with the desired data column number (e.g., email address column number in Contacts sheet).
- “[is_sorted]” is optional. If the data in your Contacts sheet is sorted by customer name (ascending), enter TRUE for faster processing.
SUMIFS and AVERAGEIFS (Conditional Calculations)
- Determine the conditions for your calculation (e.g., calculate the average deal size for deals in the “Opportunity” stage).

Source: Screenshot
- In your target cell (e.g., Reports sheet), enter the SUMIFS formula: =SUMIFS(sum_range, criteria_range1, criteria1, [criteria_range2, criteria2], …)
- Replace “sum_range” with the cell range containing the values you want to sum (e.g., deal size column in the Sales Pipeline sheet).
- Replace “criteria_range1” with the cell range containing the data you want to filter by (e.g., the Sales Stage column in the Sales Pipeline sheet).
- Replace “criteria1” with the condition for filtering (e.g., “Opportunity”).
- You can add more criteria_range and criteria pairs for additional filtering conditions.

Source: Screenshot
- Replace SUM with AVERAGE when calculating averages based on specific criteria.
TODAY and DATE (Automate Dates)
Source: Screenshot
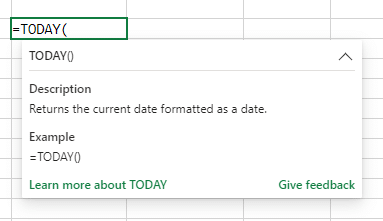
- In your target cell (e.g., Due Date column in the Tasks sheet), enter the TODAY function (=TODAY()) to populate today’s date.
- To set a due date seven days from today, enter: =TODAY() + 7.
Step 5.2: Implementing Conditional Formatting (Visually Highlight Information):
- Choose the cells you want to format based on specific criteria (e.g., Close Date column in the Sales Pipeline sheet).

Source: Screenshot
- Go to the “Home” tab and click “Conditional Formatting” within the “Styles” section.
- Choose a formatting rule based on your needs.
Step 6: Building Macros for Automation (Requires VBA Knowledge)
Macro development requires some familiarity with the VBA programming language. There are online resources and tutorials available for macro development. Here are some potential applications and a general outline for creating macros:
Step 6.1: Automating Data Entry

Source: Screenshot
- Go to the “Developer” tab (enable it if hidden) and click “Record Macro.” Assign a descriptive name and choose a shortcut key (optional).
- Manually enter data into the fields you want to automate (e.g., filling website based on company name).
- On the Developer tab, select “Stop Recording”.
- You can edit the recorded VBA code to fine-tune the automation process (advanced users).
- Whenever you need to automate data entry, use the macro. To run the macro, click the “Macros” button on the Developer tab and select your recorded macro.
Step 6.2: Generating Reports
- Plan the report layout and data points you want to include.
- Use VBA commands to:
- Copy and format data from relevant sheets into your report template.
- Insert formulas and charts for calculations and visualizations.
- Create a button on your worksheet to trigger the report generation macro.
Step 6.3: Sending Personalized Emails
- Consider utilizing email automation add-ins. These add-ins are Excel-compatible, allowing for more comprehensive functionality.
- Use VBA to connect with the add-in and customize email content using CRM data.
By using Excel formulae, you may improve the effectiveness of your CRM. Conditional formatting and macros can also help to improve its functionality. These technologies save significant time, enabling you to concentrate on developing relationships with your consumers.
Wrapping Up
Finally, you’ve created a robust Excel CRM system for streamlining customer interactions and strengthening connections. Remember, your CRM is a live document that can grow alongside your company. To fully realize its potential, examine data and user comments to discover areas for development.
As your company grows, consider moving your CRM to a cloud-based platform like Google Sheets. This enables safe, real-time communication and increased accessibility for your team. Remember, an Excel CRM is a step toward efficient customer relationship management.


