
How to Make a CRM in Google Sheets
Want to make your customer management procedure go more smoothly? Creating a CRM system with Google Sheets could be the answer you’re looking for. We’ll explore the what, why, and how of creating your own CRM using this flexible platform in this guide. Now let’s get going.
What is a Google Sheets CRM?
A customer relationship management system created with Google Sheets is known as a Google Sheets CRM. It makes use of Google Sheets’ collaborative and adaptable features to manage, track, and arrange customer, lead, and contact interactions.
Why Should You Use Google Sheets for CRM?
Because of its cost, affordability, and accessibility, Google Sheets is a desirable choice for companies of all sizes. Simple communication, adaptability to particular requirements, and smooth interaction with other Google Workspace technologies are all made possible by it.
How Does It Work?
To create a Google Sheets CRM, structure your spreadsheet to collect and arrange essential information about your customers, interactions, sales pipeline, and other topics. To improve usefulness and productivity, make use of features like automation, conditional formatting, and data validation.
Step-by-Step Guide
Go to Google Sheets
If you don’t already have one, you must first make a Google Sheets CRM template. With the standard logic, Google Sheets may be used as a CRM. Users can easily import data from other platforms into their Google Spreadsheets and add, update, and delete rows and columns.
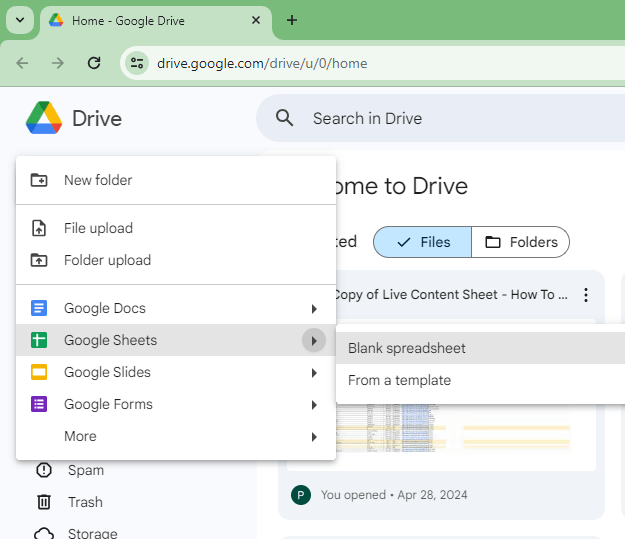
Open a Blank Sheet
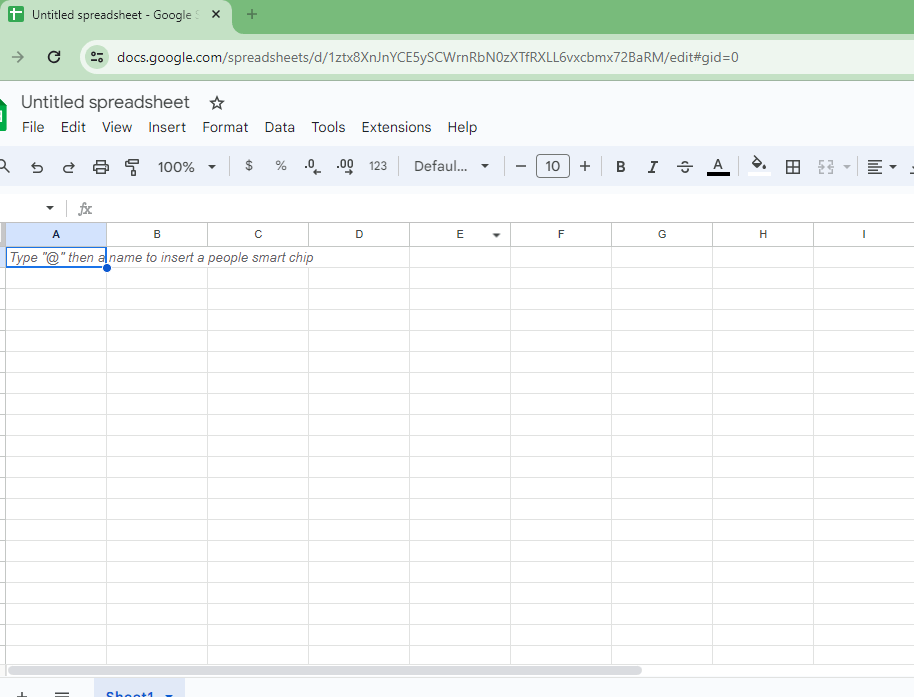
Source: Personal Screenshot
Go to Tools and Create Form
If you haven’t already, spend some time defining your present sales process. Jot down the procedures you follow to complete a deal. Next, try to identify areas where it could be improved. This will help you identify fields for the form.

Source: Personal Screenshot
Name the Form as “Lead Capture Form”
You may use Google Sheets to organize and manage team member responsibilities by creating distinct worksheets for sales and customer service. Making a Google Sheets CRM just requires a few easy steps.
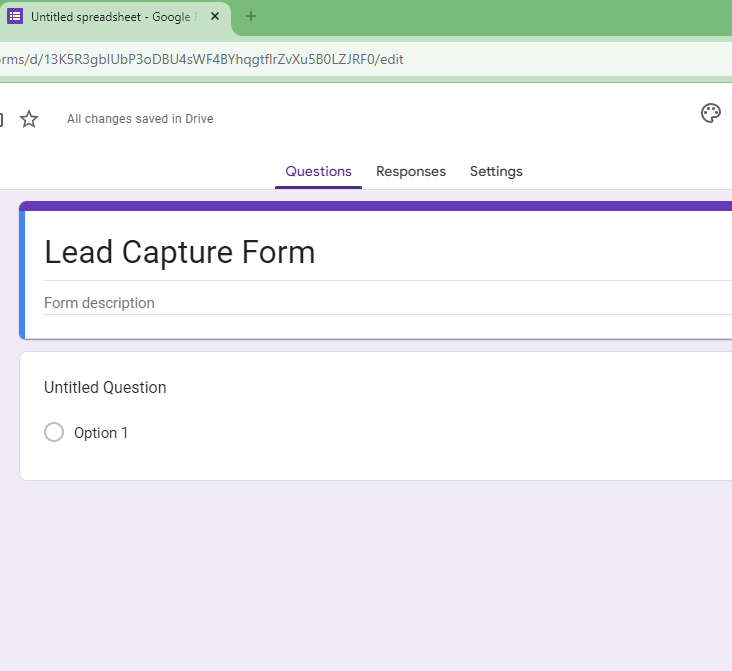
Source: Personal Screenshot
Add Specific Fields
Create a form to input data such as name, mobile number., company name, and company address.

Source: Personal Screenshot
Don’t forget to modify your CRM fields to ensure they are appropriate for your particular company. A vehicle dealership, for example, does not require a section for corporate names.
Check the Responses
As soon as you create the form, the response from the sheet will be saved in the spreadsheet automatically.
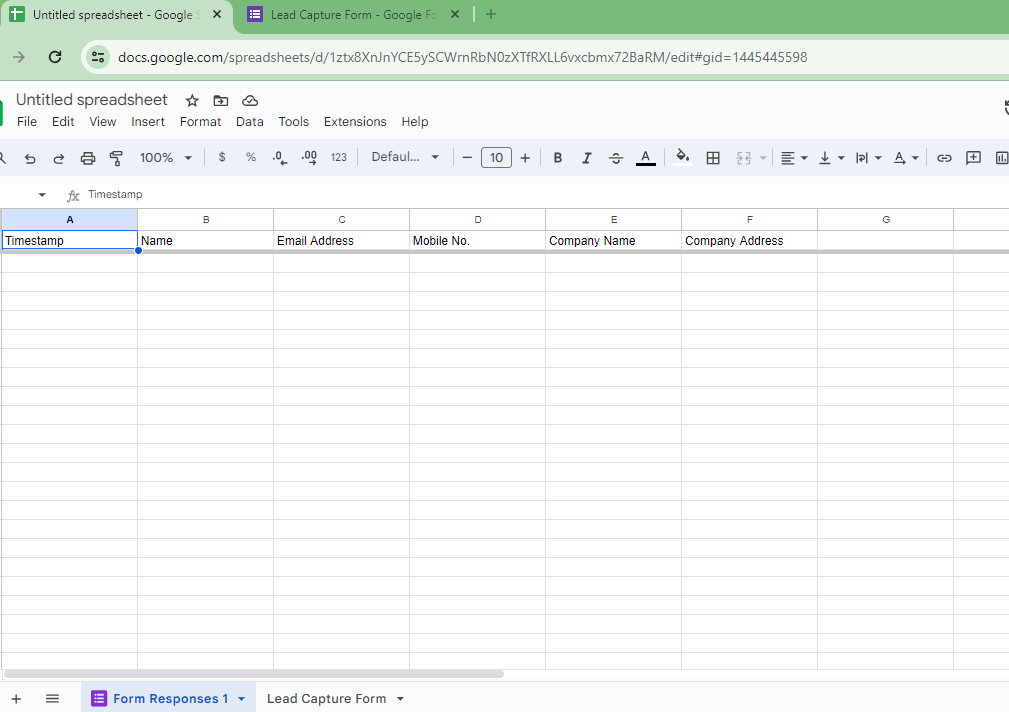
Source: Personal Screenshot
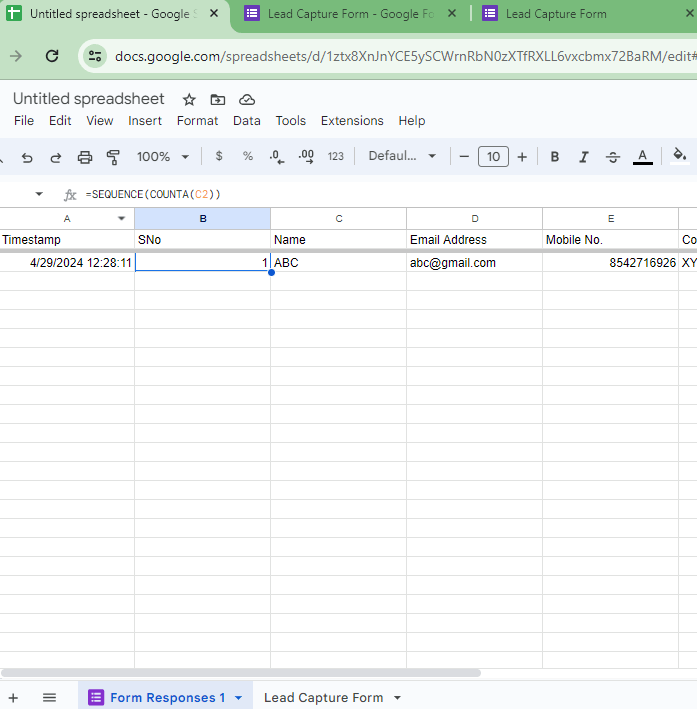
Add Lead Number or Serial Number
Add ‘the’ serial number’ column before the ‘Name’ column and add a formula for the serial number to automatically add a serial number for every entry.
=SEQUENCE(COUNTA(C2)
Source: Personal Screenshot
The serial number works as a lead number, so you can change the name to “Lead No.” too.
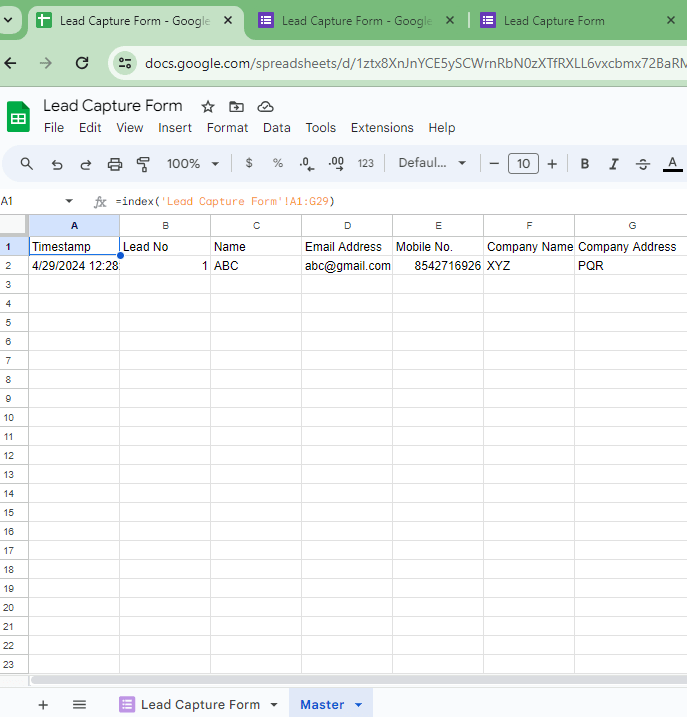
Create a Master Sheet
Create a master sheet and retrieve data from the Lead Capture Form using the index formula to capture all the data from the previous sheet.
=index(‘Lead Capture Form’!A1:G29)
Source: Personal Screenshot
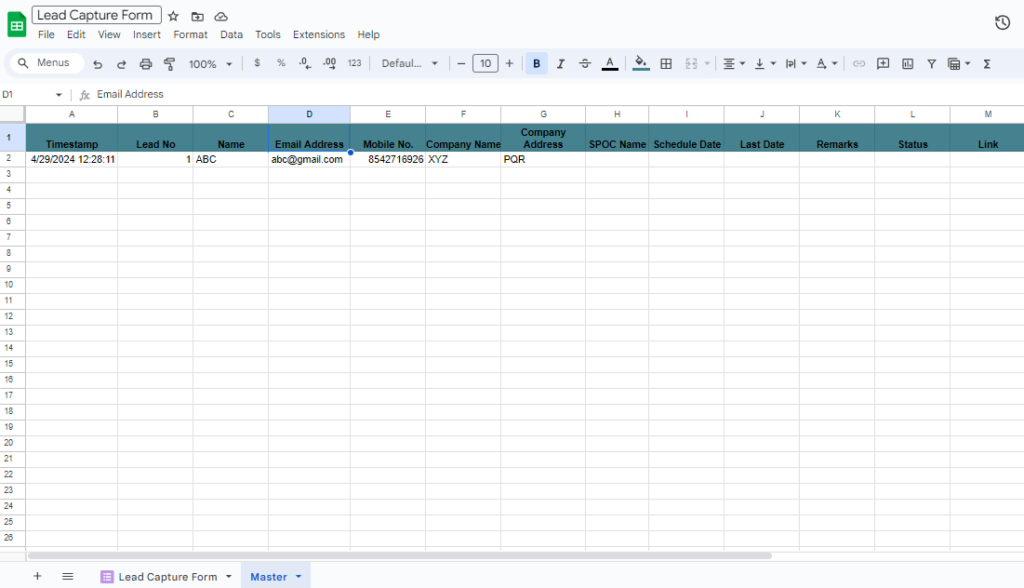
Add Follow Up Columns
Add extra columns for SPOC Name, Schedule date, Last Date, Remarks, Status, and Link (this is for follow-up). You can format it with different colors to make it look presentable and easy to read.
Source: Personal Screenshot
SPOC is a single point of contact or salesperson. You can have one or many SPOCs.
The link is used for follow-up reasons.
As soon as you start getting leads, it should be automatically allotted to SPOC.
You should adapt your CRM spreadsheet template to your evolving goals as your company grows. This covers changing the number of columns, convergent quotas, and other things.
Create a Sales Person Name Sheet
Create another sheet named SPOC LIST.

Source: Personal Screenshot
Column names should be ID and Name, which are random names and numbers of salespeople. Add the names of the salespeople. Also, add the numbers in the text form. You can change the number to a text form by selecting the column, going to format, and clicking on plain text.
Link Both Forms
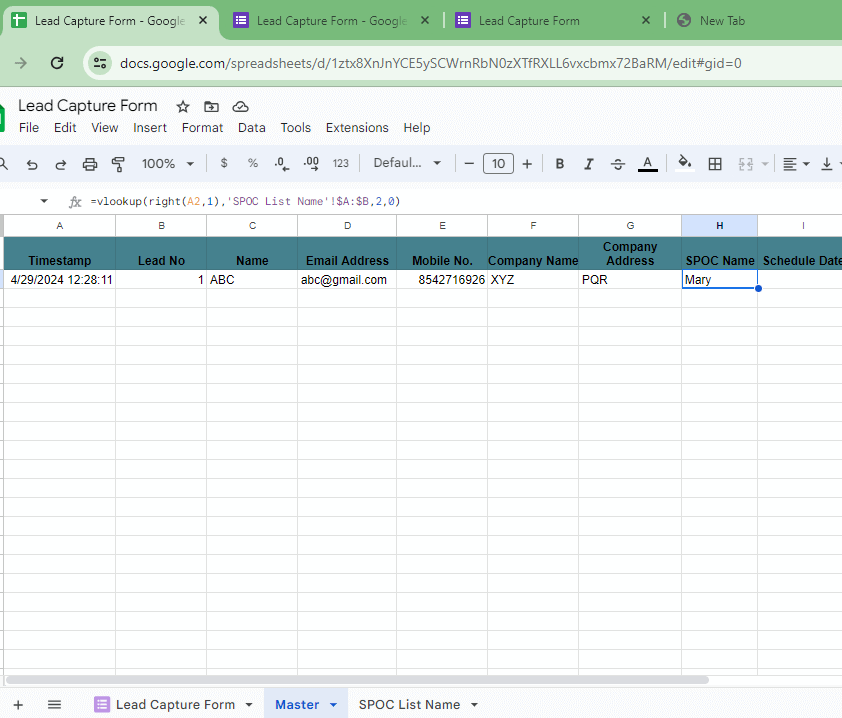
Go to the Master sheet, and to get the SPOC Name as per the SPOC List, use vlookup in the SPOC Name column in the master sheet. This is done to fetch the name of the person based on their ID or Lead No. The formula looks like this:
=vlookup(right(A2,1),’SPOC List Name’!$A:$B,2,0)
Source: Personal Screenshot
This formula will look for a value in the column and return the name from the ID column in the same row in the SPOC List Name.
If your contact list is small, this is a decent choice. Even though manually entering multiple data points into your CRM spreadsheet can be difficult, it can be completed gradually and in a few minutes each day.
Capture SPOC Status
Create another Form named SPOC Status.
This is needed to record the response for the salesperson.
Source: Personal Screenshot
Provide various questions, such as Lead No., Status, Remarks, etc.
Make Status Required
Status should have multiple options to choose from. Use options such as ‘Interested,’ ‘Ordered,’ etc.

Source: Personal Screenshot
Also, mark ‘Status’ as required.
The options used under ‘Status’ might need to be modified based on how your sales process operates. Never forget that you own this Google Sheet CRM. It may, therefore, be customized to your exact specifications. You can add or remove sections as you see fit.
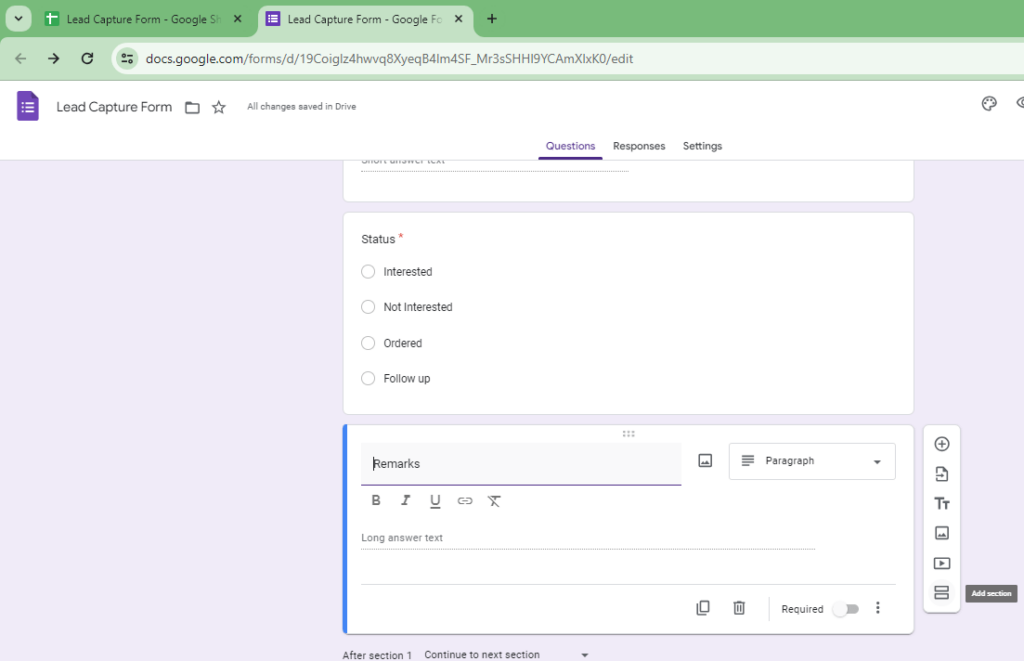
Add Another Section
On the right sidebar, click on Add Section.
Source: Personal Screenshot
This section is added for the follow-up question in section 1.
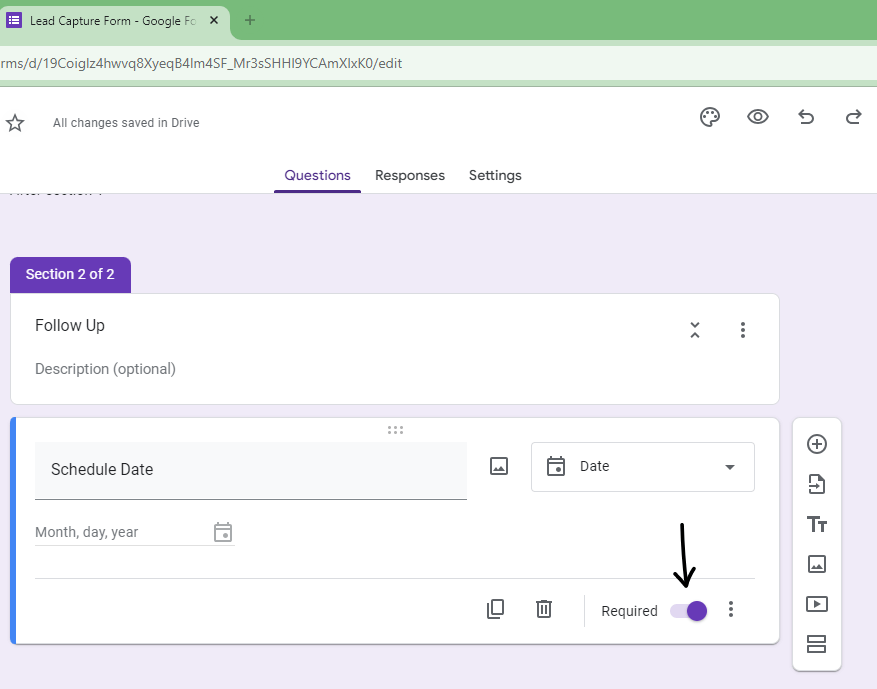
Add Fields in Section 2
Name this section ‘Follow-Up’ and add the ‘Schedule Date’ Field.
Source: Personal Screenshot
Make sure to mark the Schedule date as “Required.”
Link ‘Follow Up’ with Section 2
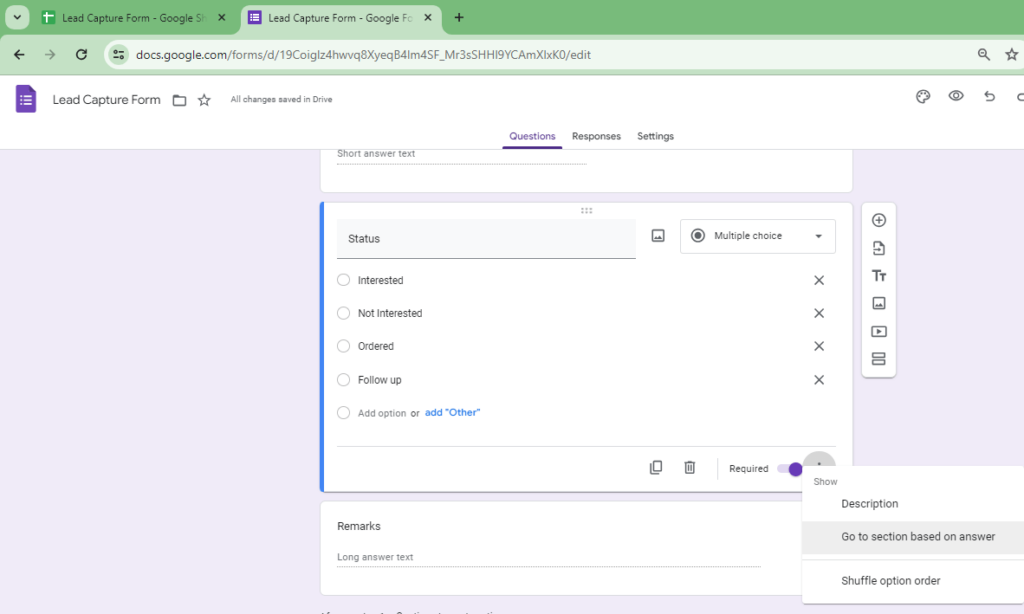
In Section 1 of this form, Go to Status, and then Click on three dots on the right-hand side next to ‘Required,’ and click on ‘Go to section based on answer.’
Source: Personal Screenshot
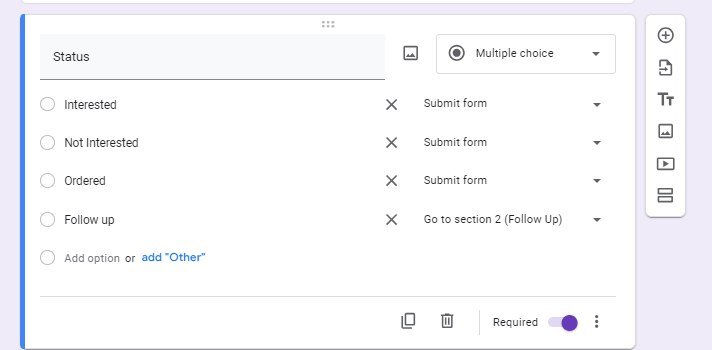
Change all options to ‘Submit form’ except ‘Follow up’, which is changed to ‘Go to section 2 (Follow Up).’
Source: Personal Screenshot
Make sure the end of the first section is also changed to “Submit form.”
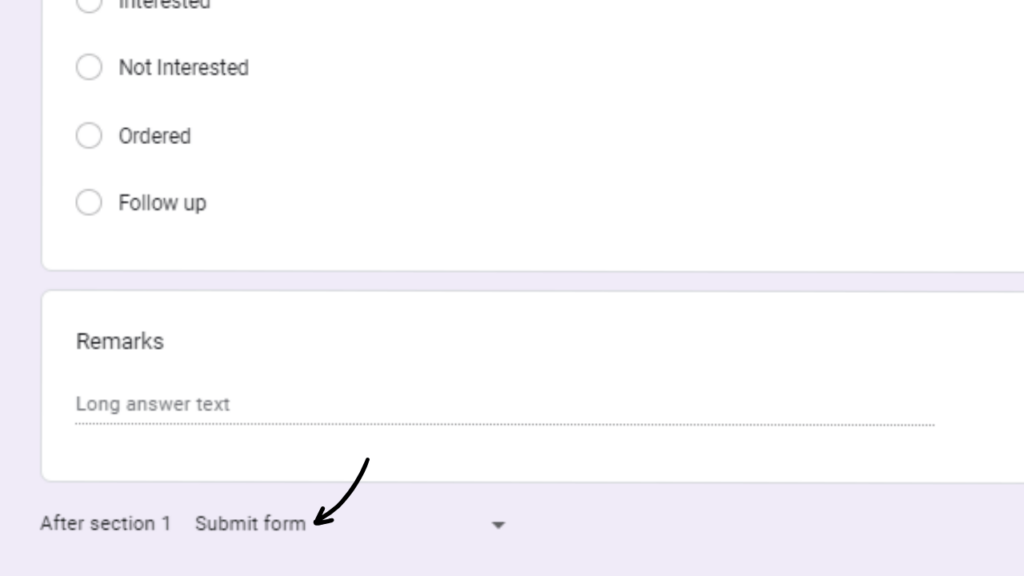
Source: Personal Screenshot
Get Pre-filled Link
Go to the SPOC Status form, click on the three dots at the top right corner, and click on the Get Pre-filled link.
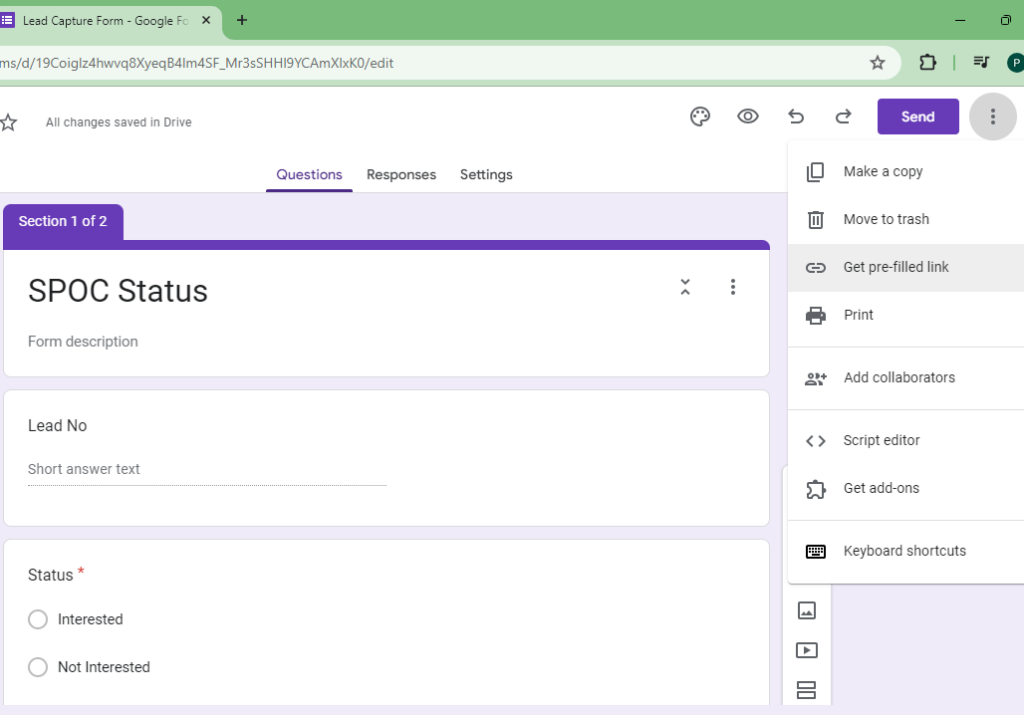
Source: Personal Screenshot
Get Link
To get the link, add any random lead number. and click on Get Link at the end of the form.
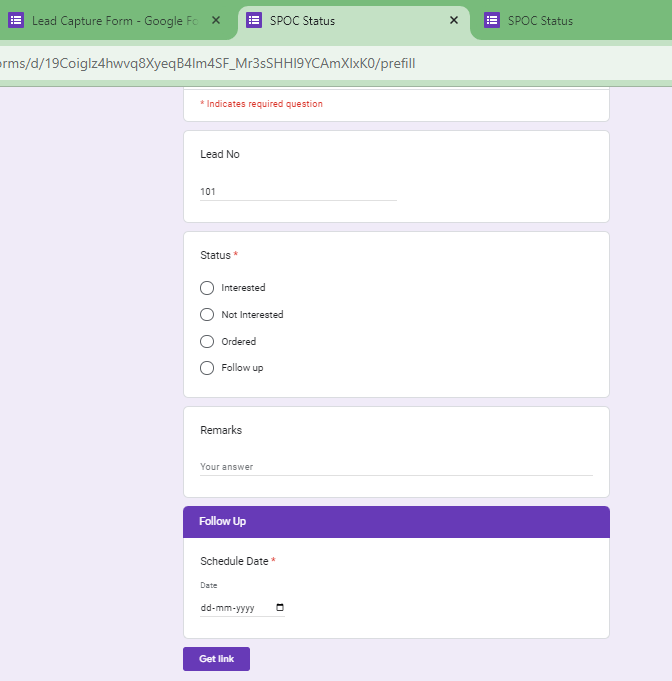
Source: Personal Screenshot
Concatenate Lead Number
Once you click on the ‘Get link’ option at the end of the form, you will be asked to copy it.

Source: Personal Screenshot
Copy the link and paste it into the URL bar. The end digits of this URL represent the lead number. This URL can be used in the Master sheet to generate hyperlink a hyperlink corresponding to a specific Lead Number.
Generating Link
Using the previous URL, change the end digits to ‘&’ and apply the hyperlink formula to generate a link.
=hyperlink(“https://docs.google.com/forms/d/e/1FAIpQLSdjW5qtk1qFIjoPHCimgMGgPVD5-oFE1zEwFT3-iB4RbKebiQ/viewform?usp=pp_url&entry.988390399=”&B2,”Click”)
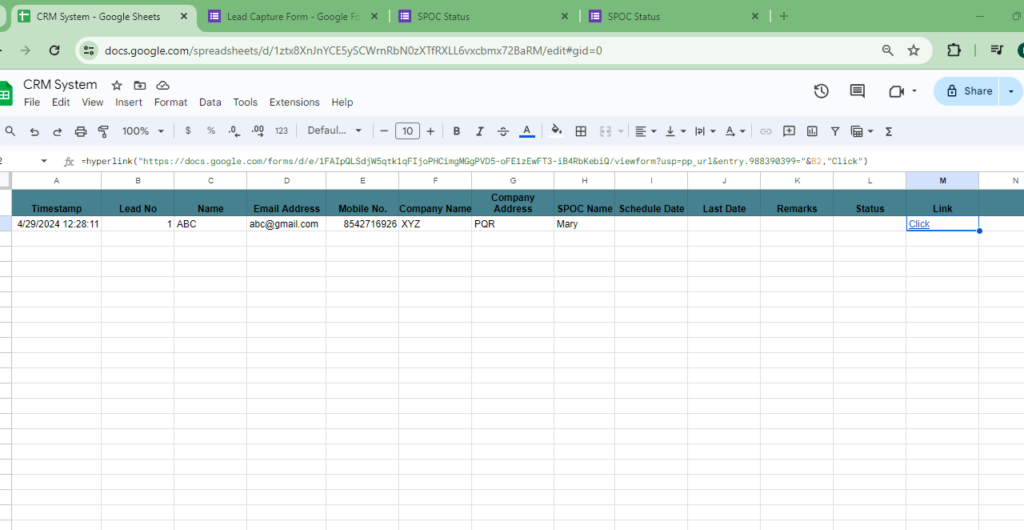
Source: Personal Screenshot
Fetching Scheduled Date
For the ‘Schedule Date’ column in the Master sheet, use the following formula to look for the Lead number or ID and return the date for the same ID in the SPOC Status Sheet.
=vlookup(B2,sort(‘SPOC Status’!B:E,4,1),4,0)

Source: Personal Screenshot
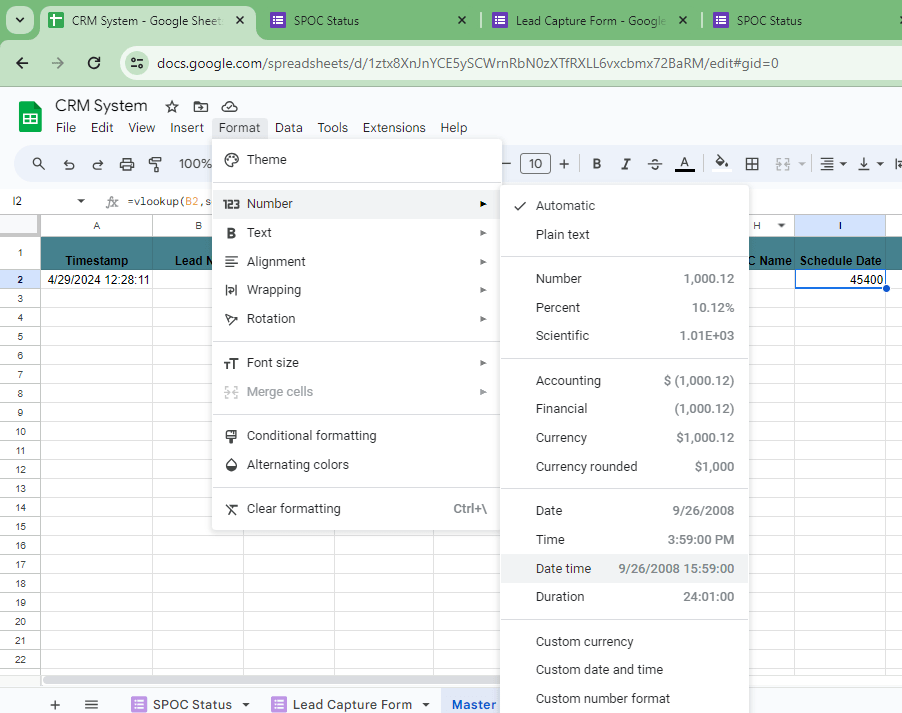
Modify Date Format
Change the date format by going to Format->Number->Date.
Source: Personal Screenshot
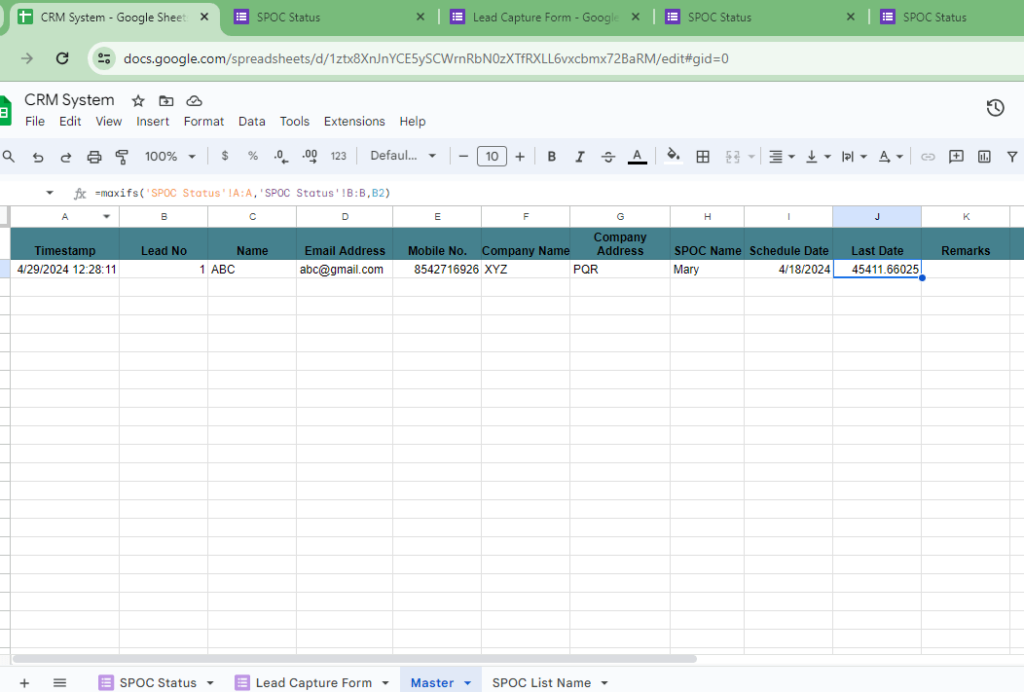
Fetching ‘Last Date’
Source: Personal Screenshot
For the ‘Last Date’ column in the master sheet, use the ‘maxifs’ function as shown in the screenshot.
This column is used to save the last date on which follow-up was recorded. You can also change the format of the date by going to format->number->date
Fetching Remarks
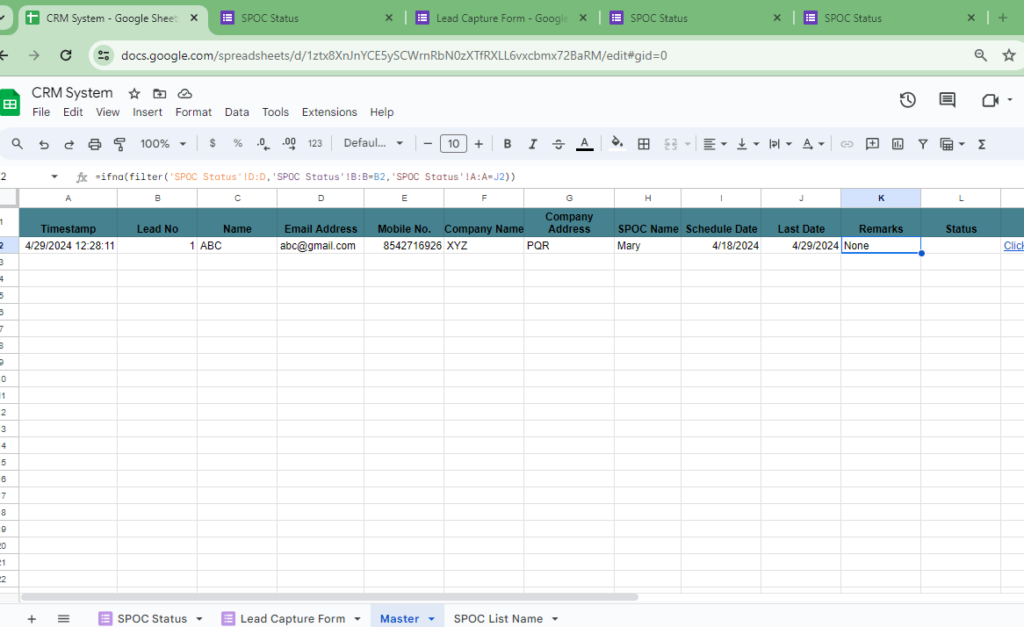
Remarks depend on lead number, last date, and timestamp. Use the vlookup formula to fetch remarks. You can also use a filter formula to fetch data for this column.
=ifna(filter(‘SPOC Status’!D:D,’SPOC Status’!B:B=B2,’SPOC Status’!A:A=J2))
Source: Personal Screenshot
Fetching the Status
Status can also be fetched using the same formula as above and changing the column names concerned.
=ifna(filter(‘SPOC Status’!C:C,’SPOC Status’!B:B=B2,’SPOC Status’!A:A=J2))

Source: Personal Screenshot
Run Live Form
To add more entries, you can go to the ‘Lead Capture’ Live Form and fill in the data. It should be reflected in the master sheet. Make sure you drag the formulas to make them work for all the cells in the master sheet.

Source: Personal Screenshot
After making any necessary modifications to your template, it’s time to get down to business. Start by entering the data from your present pipeline, being careful to include all pertinent information in the right places.
Share the CRM Google Sheet
It’s now time to distribute your brand-new Google Sheet CRM to everyone else who requires it.
The first stage in the sharing procedure is selecting the recipients of the document. Everyone who has direct contact with clients and potential clients, such as your customer support and sales teams, should be included.
Bonus point: You can communicate with other team members directly in Google Sheets and observe their activities in real-time.
Secondly, you will have to provide other people’s access choices. Google Sheets has three access levels: view-only, commenting, and full editing.
Advantages and Disadvantages
Let’s now explore the benefits and drawbacks of creating a CRM using Google Sheets. Even though it has several advantages, such as price and personalization, there are concerns about functioning and scalability.
Advantages
Economical FIx
Since Google Sheets builds CRMs without the need for pricey software licenses, companies of all sizes—especially startups and small businesses—can use them.
Adaptable to Meet Specific Needs
With Google Sheets, you can customize your CRM to meet your business needs exactly. Fields can be added or removed, new formulas can be created, and layouts can be designed to match your workflow.
Features for Seamless Sharing and Collaboration
Multiple team members can access and change the CRM at the same time using Google Sheets, which promotes teamwork and guarantees that everyone is in agreement. Decision-making and communication are streamlined via real-time sharing and discussion.
Connectivity to More Google Workspace Tools
Take advantage of the integration capabilities of programs like Google Drive, Calendar, and Gmail. You can quickly link emails, set up follow-ups, and store documents from within your CRM thanks to this one workflow.
Disadvantages
Requires Manual Setup and Maintenance
It takes significant labor to create and manage a Google Sheets CRM, from organizing the spreadsheet to entering data and ensuring its accuracy. This can take a lot of time, particularly as your company expands and the number of data points rises.
Offers Fewer Advanced CRM Functionalities than Dedicated CRM Software
Although Google Sheets has basic CRM functions, it does not have as many sophisticated features as dedicated CRM software, such as marketing automation, sophisticated reporting, or advanced analytics.
Possible Scalability Issues for Expanding Companies
While Google Sheets works well for small and medium-sized companies, its scalability may not be as flexible for larger organizations. Without specialized CRM software built for scalability, managing large data volumes and supporting intricate workflows can become difficult.
Final Thoughts
Companies looking for an adaptable and affordable way to manage their customers effectively may find that building a CRM system with Google Sheets is the way to go. Through the use of its adaptable functionalities and smooth cooperation, you may optimize procedures and augment efficiency.
However, as your company grows, it’s critical to understand its limitations regarding expanded functionality and scalability. In the end, balancing the benefits and drawbacks will enable you to decide whether Google Sheets CRM meets your company’s requirements and objectives.


