


25, September, 2024

At BestCRMSoftware.com, we prioritize transparency and honesty in all our content. In order to maintain the quality of our reviews and to keep providing valuable information to our audience at no cost, We earn commissions through clicks and affiliate purchases from select links in our articles.
Our commitment to unbiased content remains unwavering, despite our use of affiliate links. These links do not influence the opinions or recommendations provided by our editorial team. We prioritize integrity and objectivity in every piece of content we produce, ensuring that our readers receive unbiased and reliable information to inform their decisions effectively.
How to Migrate Data in Zoho CRM: A Step-by-step Guide

Biography
Anna Rodriguez is a CRM consultant with 4 years of experience in helping businesses across various industries select, implement, and manage their CRM systems. She is skilled in CRM system customization, data migration, and user adoption strategies. Anna is passionate about helping businesses unlock the full potential of their CRM systems and fostering a customer-centric culture within organizations. She constantly keeps on top of the newest industry trends and holds a Bachelor's degree in Information Technology.
View Author Profile

Biography
David Lee brings over 3 years of CRM experience to the table, with a proven track record of success in helping businesses leverage technology to achieve their customer relationship goals. He is a data-driven CRM strategist with a keen understanding of how to utilize CRM systems to gain actionable customer insights and personalize customer interactions. David is a regular contributor to industry publications and frequently speaks at CRM conferences, sharing his knowledge and best practices with the CRM community. He holds a Master's degree in Business Administration (MBA) with a specialization in Marketing.
View Author Profile
Latest Update:
Sep 16, 2024, 8:45 am
Editorial Note:
We might earn a commission from partner links on BestCRMSoftware.com. These commissions do not affect our writers and editors’ opinions or evaluations.
Quick Introduction:
Are you seeking to eliminate inaccuracies in your data migration process and transition from manual to automated methods? Look no further than the automated data migration processes offered by Zoho CRM.
Use the data migration wizard to migrate data in Zoho CRM. It ensures accurate data transfer to the CRM module while reducing the need for manual efforts. Moreover, it automatically aligns your import files with CRM modules and maps import file columns to Zoho CRM fields.
If a module is unavailable, Zoho CRM creates it and maps the corresponding files. The data migration wizard provides clear insights into mapped, unmapped, and unsupported files.
Learn how to migrate data in Zoho CRM with our comprehensive step-by-step guide.
Step-by-Step Process to Migrate Data in Zoho CRM
To effortlessly transfer data from various CRMs to Zoho CRM, you must have administrator privileges in your Zoho CRM account. Here is a step-by-step guide for you:
Step 1: Access Data Migration Page
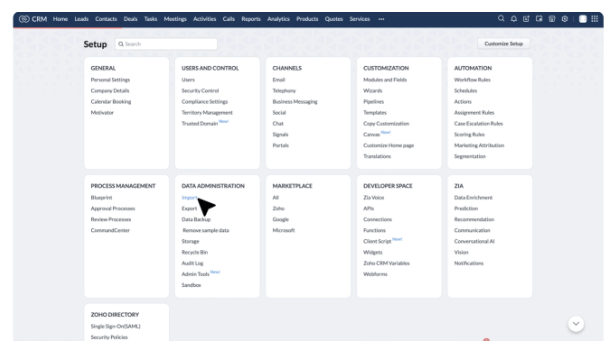
- Log in to a Zoho CRM account.
- Go to ‘setup’ > ‘data administration’ > ‘import.’
- On the data administration page, ‘choose the system’ from which you want to migrate data, such as Salesforce.
Step 2: Upload Data Files

- You will see a pop-up, here browse and upload the files. To migrate data into more than one module, you can either select multiple files or choose a zip file.
- Click ‘next,’ Zoho CRM automatically scans the file and then maps them to their appropriate modules and fields.
Step 3: Module-File Mapping

- In the module file mapping, you will be able to see the mapped and unmapped modules separately.
- You can also click on a file to see in which module it is mapped to.
- You will also be able to see the unmapped, mapped, and unsupported files separately.
- You can select the unmapped files and map them to their relevant modules.
- To start again, click the ‘discard migration’ link.
Step 4: Create a New Module or Use a Custom Module

- If no modules relevant to the files exist, you can use the ‘create a new module’ option or the CRM-suggested custom modules, which are starred yellow.
- Enter the ‘module-name’ and click ‘next.’
- Select the file to be mapped with this module, click ‘save,’ and then click ‘next.’
- You will have access to the list of mapped modules, where you can map the fields for each module.
Step 5: Field Mapping
- In the ‘field mapping tab’, you will be able to see all the fields present in Zoho CRM through dropdown lists.
- To add new fields, click ‘Create new fields.’ Ensure that you enter the data for these fields before or during the data migration.
- In the pop-up of ‘create new fields’, modify the field labels.
- Any fields from the import files that could not be mapped for migration due to their absence in Zoho CRM will be listed along with their respective column numbers. For such data, choose the ‘field type’ from the dropdown list.
- Click ‘create’ and then to continue the migration process, click ‘close.’
Step 6: Reset/Auto Mapping

- To start mapping from scratch, click ‘reset mapping.’
- To let the CRM automatically map the import columns to relevant files, click ‘auto map.’
Step 7: Edit/Add Fields
- Hover over the fields, and in the ‘replace empty values’ textbox, type the field values. If an imported file lacks values that are mandatory in the CRM, the record will not be imported. In this step, you prevent this from happening by specifying an alternate value to replace the empty field.
- To map multiple fields in the CRM with a single field from the file, hover over the fields and click the ‘add(+)’ icon next to the field name.
- To ensure that the value you mentioned as default is used for all records, click the ‘assign default values’ tab and select ‘CRM fields’ with relevant default values.
- Then, click ‘Save and next.’
Step 8: Review Mapping and Start Migration
- Check the field mapping status and pre-migration status of each module in the ‘review page.’
- To initiate data migration, click ‘ Start migration.’
Step 9: Check Data Accuracy
- You will receive an email notification after the data migration is completed.
- To ensure data accuracy, go to ‘import history’ by clicking on ‘setup’ > ‘data administration’ > ‘import’ > ‘import history’
Zoho CRM extends advanced contact and lead management options, along with customizable fields and lead scoring, advanced reports and analytics, and more. Therefore, streamline your data migration process in Zoho CRM and ensure a seamless transition of your valuable information.
Recommended Articles


17, September, 2024