Hubspot CRM implementation
Quick introduction
Starting with HubSpot’s free CRM can be an exciting step towards streamlining your business processes. Whether you’re looking to enhance customer relationships, manage your sales pipeline more efficiently, or organize your contacts, HubSpot CRM offers a plethora of benefits to achieve your goals.
This guide will walk you through the essential steps of setting up your HubSpot CRM. Follow these steps to create a fully operational system tailored to your business needs, enabling you to focus more on growth and less on manual tasks.
Step 1: Kick Off With Email Integration

Email integration is a foundational step, as it enables a more organized and efficient handling of your business communications right from the start.
Email integration with HubSpot CRM systems includes two vital components:
- Inbox connection
- Email extension
By connecting your inbox to the CRM, you can send emails directly from individual contact records. This unlocks a suite of features, such as automatic logging of email replies.
Why Does Email Integration Matter?
Email integration is crucial because it automates the tracking of all email communications directly within your CRM, ensuring no interaction is missed.
The email extension enhances your Google, Outlook, or Office 365 inbox with CRM functionalities. This enables you to access contact records, log emails, and utilize tools like email templates and meeting links seamlessly from your inbox.
How Does it Work
For users of Google or Office 365, the process involves connecting your inbox using your account credentials.
If you’re with a different email provider, you can use IMAP for integration. Once set up, your CRM system and email inbox will synchronize, keeping each other updated on the emails exchanged with your contacts.
Stepwise Breakdown: How to Activate Your Email Integration
1. Determine Your Email Provider
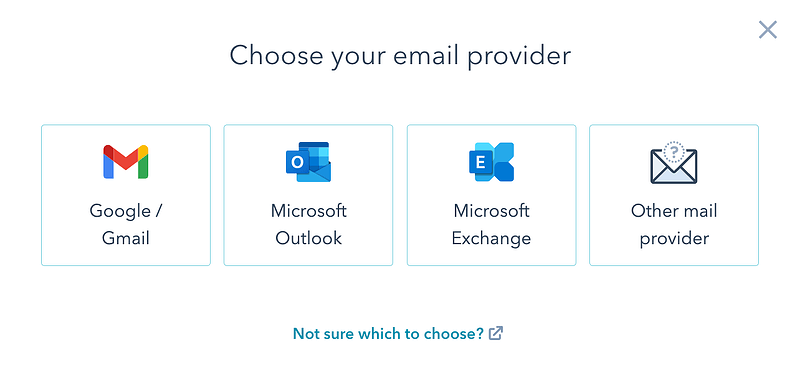
Identify whether you’re using Google, Outlook, Office 365, or another provider. This will dictate your integration path.
2. Connect Your Inbox
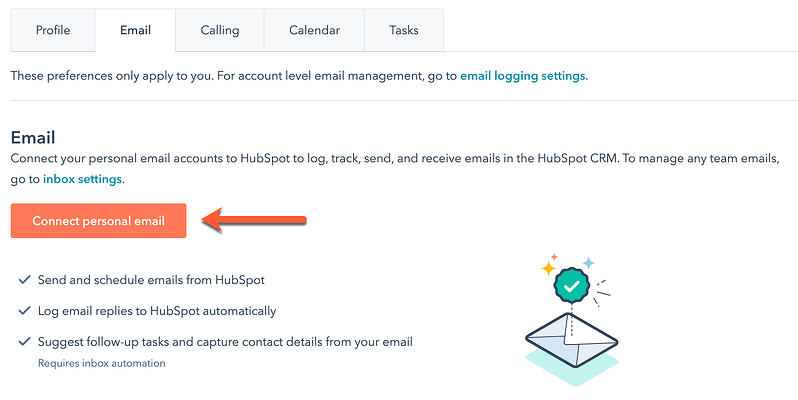
- For Google or Office 365 users, navigate to your HubSpot CRM settings and select the option to connect your inbox. Follow the prompts to log in with your account credentials.
- If using another provider, select the IMAP option and follow the instructions to establish the connection.
3. Install the Email Extension

- For Gmail Users: Install the Chrome extension from the Chrome Web Store to integrate CRM tools into your Gmail inbox when accessed through Chrome.
- For Web Version Outlook Users: Obtain the email extension from Microsoft AppSource to have it directly integrated into your account, accessible regardless of the browser.
- For Desktop Outlook Users: Download the Outlook add-in from the HubSpot website and follow the installation instructions.
4. Activate Automatic Email Logging
Once the email extension is installed, configure it to log emails to the CRM automatically. This ensures all correspondence is tracked within your CRM environment.
Step 2: Create Filters
Filters in HubSpot CRM allow you to segment and organize your contact records in real-time. This dynamic tool enables you to compile lists of contacts based on any recorded information within the CRM.
Whether you need to group contacts by demographic details, interaction history, or any other criteria, filters make it possible to access and manage these segmented lists swiftly.
Why Filters are Fundamental?
The primary advantage of employing filters in your CRM strategy is their capability to structure your data into actionable segments.
With filters, you can pinpoint which contacts deserve your attention, ensuring no opportunity or task slips through the cracks. This not only optimizes your engagement strategies but also significantly boosts productivity by streamlining contact management.
How Does Hubspot CRM Filters Work
HubSpot CRM categorizes each contact with various properties, such as name, email address, and company affiliation.
Even if your contact properties are initially sparse, utilizing email integration populates these fields over time. You can filter contacts based on interactions—like the last opened sales email or the most recent reply—to identify and prioritize engagements.
Additionally, properties like “Number of times contacted” allow you to plan your outreach efforts strategically. The more data you feed into your CRM, the more refined your filtering capabilities become.
How to Set Up Your Filters: A Step-by-Step Guide
1. Review Your Data
Start by examining the existing contact properties in your CRM to understand what information is available for filtering.
2. Identify Key Segmentation Criteria
Decide on which criteria are most relevant to your current goals. This could be based on recent interactions, demographic information, or engagement levels.
3. Find Filter Creation Tool
At the contacts dashboard, look for the “Filter” option, usually represented by a funnel icon, and click on it to open the filter creation tool.
4. Initiate a New Filter
Click on “Create a new filter.” This will open a selection panel where you can choose the criteria for your new filter.
5. Select Properties for Your Filter
From the selection panel, pick the properties you want to use for your filter. For engagement tracking, you might select “Recent sales email opened” or “Recent sales email replied.”
6. Set Your Filter Criteria

After selecting a property, specify the conditions it should meet. This might involve choosing contacts who have or haven’t engaged with your emails within a specific timeframe.
7. Save and Name Your Filter
With your criteria set, save your new filter. Give it a descriptive name that reflects its function, such as “Engaged Contacts.”
Once saved, your new filter is ready to use. Apply it to your contacts list to segment your contacts based on the specified criteria.
Step 3: Import Your Contacts to Expand Your CRM
Importing contacts into HubSpot CRM is a crucial part of the HubSpot implementation process. It transfers all valuable contact information from previous systems or databases into HubSpot.
This includes basic contact details and related information on companies and sales opportunities (deals). By importing, you consolidate all your data within HubSpot to manage and nurture your business relationships more effectively.
Why Importing Contacts Will Elevate Your CRM?
The real power of a CRM system lies in the volume and quality of data it holds.
By importing historical records and contacts, you significantly enhance the CRM’s capability to organize and categorize information.
This enriched database allows for more targeted outreach efforts, leading to improved outcomes in your sales and marketing activities. Essentially, the more data you transfer into your CRM, the more valuable insights and efficiencies you can extract from it.
How Does the Import Process Work
HubSpot CRM facilitates contact imports either from a spreadsheet or directly from your Gmail contacts.
When using a spreadsheet, you’ll need to allocate a column for each contact property you wish to import. This structured approach allows you to populate your CRM with extensive details in one go.
Executing the Contact Import: A Step-by-Step Guide
1. Initiate the Import Process
On any HubSpot object home page, click “Import” in the top right corner. Alternatively, access the import settings by clicking the settings icon in the top navigation bar, navigating to “Import & Export,” and then clicking “Go to import.”
2. Start Your Import
On the Imports page, select “Start an import.” Choose “File from computer” and proceed by clicking “Next.” For repeating a previous import with identical properties, select “Repeat a past import.”
3. Select Import Type
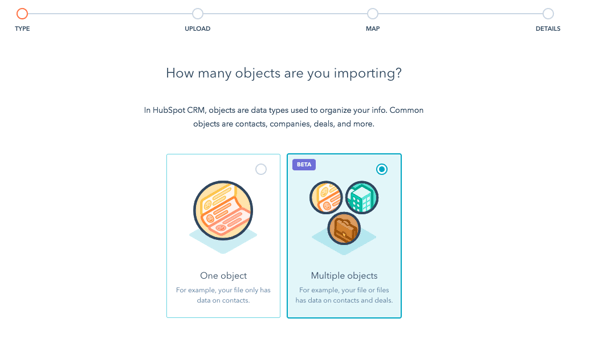
Choose the type of import based on your files:
- For a single object or activity, select “One file” followed by “One object” and specify the object or activity from your file.
- For multiple objects or activities in one file, choose “One file” then “Multiple objects” and select the applicable items in your file.
- For importing multiple objects or activities across two files, opt for “Multiple files with associations” and then specify the objects or activities.
4. Upload Your File(s)
Click “Choose a file” for each object or activity you’re importing and select the appropriate file from your computer.
5. Define Import Preferences

For each object or activity, specify how you want to import your data by selecting an option from the “Choose how to import [objects/activities]” dropdown menu. You can opt to create and update records, create new ones only, or update existing records only.
6. Map Your File Columns to HubSpot Properties
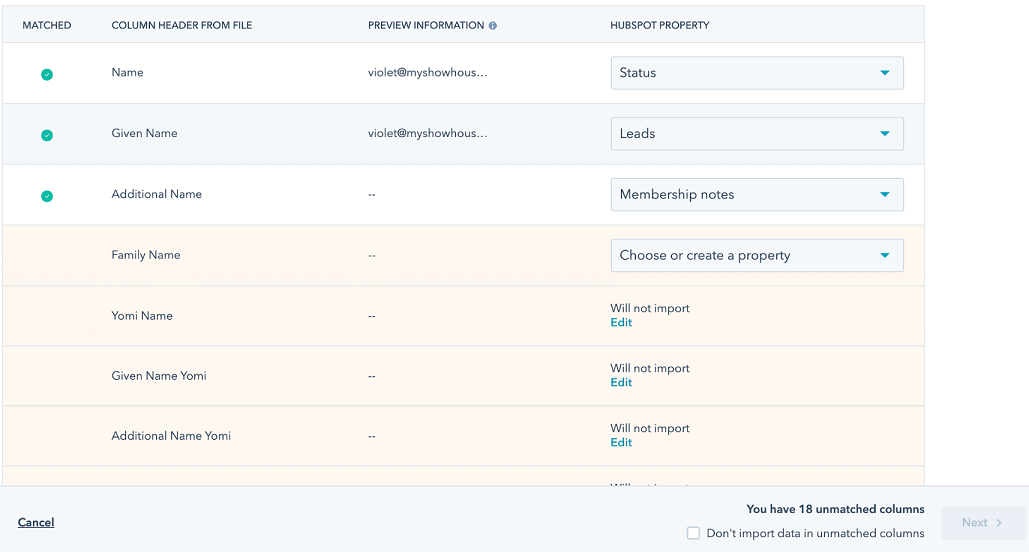
HubSpot will attempt to auto-map your file columns to properties based on headers and property names. Manually adjust any incorrect mappings by selecting the correct [Object/Activity] properties from the dropdown menus.
7. Finalize Your Import Settings
Enter an import name, select properties for deduplication (if importing multiple unique properties), and set other relevant options based on your data’s specifics, such as date and number formats.
8. Complete the Import
Review your settings and click “Finish import” to begin importing your data into HubSpot.
Step 4: Set Up The Deals Pipelines
Deal pipelines in HubSpot CRM represent the stages a deal moves through in your sales process, from initial contact to closing. Customizing your deal pipelines according to your unique sales cycle enables you to monitor and manage sales opportunities more effectively.
Why Deal Pipelines are a Game-Changer?
Having a well-defined deal pipeline is crucial for several reasons. It provides clarity and visibility into the sales process, allowing your team to focus on the right deals at the right time. It also enables more accurate forecasting and helps identify bottlenecks in the sales process, making it easier to adjust strategies and improve sales efficiency.
How Deal Pipelines Function
In HubSpot CRM, deal pipelines are composed of various stages that reflect your sales process. Each stage represents a specific step in the journey of converting a prospect into a customer. Deals are moved manually or automatically between stages based on actions taken, interactions logged, or criteria met, providing a dynamic view of your sales funnel.
A Step-by-Step Guide to Set up Your Deal Pipeline
1. Identify Your Sales Stages
Reflect on your typical sales process and identify the key stages, from lead generation to closing. Consider stages like “Initial Contact,” “Proposal Sent,” and “Closed Won/Closed Lost.”
2. Access Deal Pipeline Settings
In HubSpot CRM, navigate to the sales settings and find the section for deal pipelines.
3. Create a New Pipeline
Click on “Create a new pipeline” and name it appropriately to reflect its purpose, such as “Primary Sales Pipeline.”
4. Add Your Stages
For each stage identified, add a new stage to your pipeline. Specify the stage name, and if possible, set a probability percentage that indicates the likelihood of closing a deal at that stage.
5. Customize Stage Properties
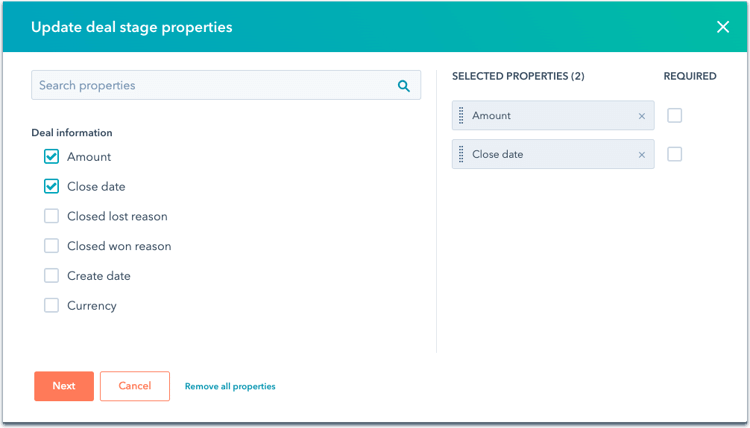
Customize each stage to include relevant properties or actions required for a deal to move to the next stage. This might include tasks like “Schedule Demo” or “Negotiation.”
Step 5: Website and Social Media Integration
Integrating HubSpot CRM with your website and social media platforms, like Facebook, involves implementing a JavaScript tracking code onto your website and connecting your social accounts directly to HubSpot.
This setup enables the creation of lead flows on your website—interactive elements designed to capture visitor information and facilitate content delivery.
Similarly, connecting your social media accounts allows for seamless interaction tracking and data collection directly within your CRM.
Why Integrating Your Online Presence Matters?
Your website and social media profiles are often the first points of contact between your company and potential customers.
Providing a seamless way for visitors to engage and share their information is crucial for nurturing these early-stage relationships. Integrating these platforms with your CRM ensures that every interaction and piece of data is captured in a centralized system, enhancing your ability to deliver personalized experiences.
How Website and Social Media Integration Works
Once the tracking code is added to your website, you can design and implement lead flows within HubSpot CRM, which will automatically appear on designated pages of your site.
For social media, connecting your accounts to HubSpot allows for direct interaction tracking, post-scheduling, and performance analytics within the CRM.
Any information submitted through your website or interactions on social media platforms is directly funneled into HubSpot, aligning with your contact and deal information.
Implementing Website and Social Media Integration: A Step-by-Step Guide
1. Install the HubSpot Tracking Code

- Obtain the JavaScript tracking code from your HubSpot account under the website integration settings.
- Add the tracking code to the header or footer of your website, ensuring it appears on every page.
2. Create Lead Flows

- In HubSpot, navigate to the lead flows section and create new lead flows designed to capture visitor information. Customize these flows with specific calls to action, forms, and content offers.
- Assign lead flows to relevant pages on your website to target specific visitor segments.
3. Connect Your Social Media Accounts

- Go to your HubSpot settings and locate the social media integration section.
- Follow the prompts to connect each of your company’s social media profiles and grant HubSpot the necessary permissions.
4. Monitor and Manage Interactions
- Use HubSpot’s dashboard to track interactions and engagements from your website and social media platforms. This includes form submissions, content downloads, and social media conversations.
- Analyze the data to refine your marketing strategies and enhance customer engagement.
Maximize Your HubSpot CRM Implementation With These Best Practices
As a platform that grows with your business, starting on the right foot can significantly impact your long-term success. Here are some tips and tricks to ensure a successful implementation and productive use:
- Data Hygiene: Maintain the integrity of your CRM data through regular clean-up exercises. Remove duplicates, update outdated information, and ensure data consistency across your records to keep your CRM a reliable source of insight.
- Engage Sales and Marketing Teams: Alignment between sales and marketing is absolutely crucial for creating winning strategies. Map out your sales process, define lead statuses, and create a service level agreement (SLA) to ensure both teams are working towards common goals with HubSpot as their toolkit.
- Expand CRM Usage Across Teams: Involve customer service teams and any other relevant teams beyond sales and marketing. HubSpot’s features, such as ticketing and task management, are designed to support a wide array of business functions.
- Leverage Integrations: HubSpot offers a plethora of integrations with other tools and platforms, to help identify your Digital DNA to personalize your tech stack further. Leverage these integrations to create a seamless tech stack that not only enhances your CRM’s capabilities but also ensures all your tools work in harmony.
- Invest in Training: Promote user adoption by training your team on HubSpot’s features. Start with quick wins like setting up email signatures, meeting scheduler links, and custom views. HubSpot’s mobile app also ensures your team can access the CRM on the go.
- Customize for Your Business Needs: Beyond the initial setup, customize HubSpot CRM to fit your specific business processes and workflows. Use custom properties and deal stages that reflect your sales cycle accurately to ensure the CRM works for you, not the other way around.
The Bottom Line
Embarking on your HubSpot CRM journey marks the beginning of a transformative path for your business, paving the way for enhanced relationships, streamlined processes, and strategic growth.
After covering the essentials, your next steps involve exploring the features and customizations that HubSpot offers to truly make it your own.
Check out our other blogs too! Our CRM experts publish helpful content daily, covering a range of topics from how-to guides to in-depth comparisons like the difference between CRM and ATS.


