How to connect facebook leads to keap
Integrating your social media leads with your CRM system is crucial for effective marketing strategies. However, manually transferring Facebook leads to Keap is a struggle. Automate your workflow and learn how to seamlessly connect Facebook Leads to your Keap CRM using Zapier in just a few steps!
This blog post will provide you with a step-by-step guide to make this process smooth and efficient.
Connecting Facebook Leads to Keap Using Zapier
Connecting Facebook leads to Keap can streamline your lead generation process. If the automation is done through Zapier, it eliminates manual data entry and reduces human error to a great extent.
1. Login to Zapier

Source: Personal Screenshot
2. Create Zap
Once you log in, click on the three dots at the top right corner and choose “Create Zap.”

Source: Personal Screenshot
3. Click on Trigger

Source: Personal Screenshot
4. Choose Trigger
Choose “Facebook Lead Ads” after clicking on Trigger.

Source: Personal Screenshot
5. Authenticate Facebook Account
Link the Facebook account to Zapier.

Source: Personal Screenshot
6. Choose Trigger Event
Choose “New Lead” as the trigger event or activation event.

Source: Personal Screenshot
Next, you need to test the event, and Zapier does so by getting test data from the Facebook account linked to Zapier.
7. Click on Action
Once the trigger is configured, you need to choose the action app.

Source: Personal Screenshot
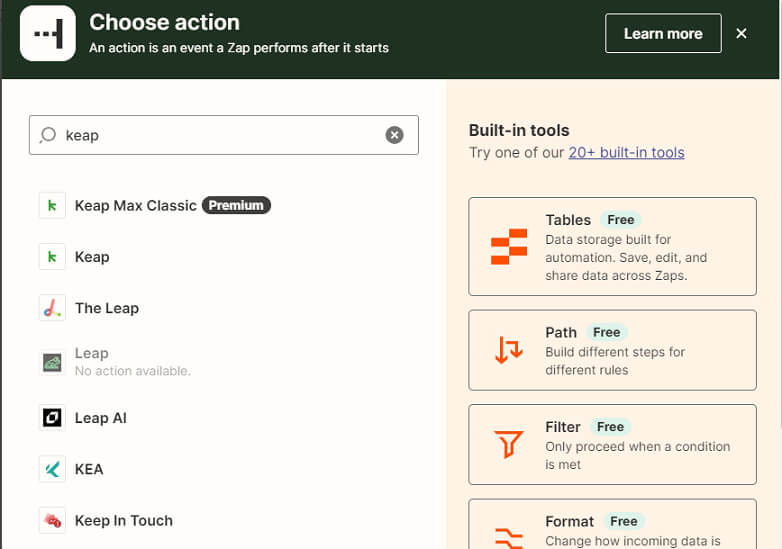
8. Choose Keap
In the search bar, write ‘Keap’ and select “Keap” from the list of apps shown on the screen.

Source: Personal Screenshot
9. Select the Action Event
Select an event to occur in the Keap app every time Facebook captures a fresh lead. Usually, for keep, the event is ‘Create or Update Contact’.

Source: Personal Screenshot
10. Click on Continue
Connect Your Keap Account
If you haven’t logged in earlier, you will need to log in to your Keap account to connect it with Zapier.

Source: Personal Screenshot
Once the Facebook and Keap accounts are linked, you can easily map fields from Facebook Lead Ads to corresponding fields in Keap.
After the mapping is over, a test record is created in Keap to test the process.
11. Turn On Zap
Activate the zap if the test is successful. This will automate the link between Facebook Lead Ads and Keap.
Key Points
Here are some important things to keep in mind:
- Ensure the mapping of fields between Facebook leads and Keap CRM is accurate.
- Filter the leads for quality maintenance before transferring them to Keap.
- Establish precise triggers for automation to ensure seamless integration.
- Thoroughly test to identify and address any issues.
- Maintain compliance with data privacy regulations throughout the entire process.
Conclusion
Integrating your Facebook leads with Keap is a game-changer for your marketing efforts. By following the step-by-step process outlined in this post, you can efficiently connect your leads and improve lead management. Embrace the power of automation and data integration to elevate your marketing strategies. Start connecting your Facebook leads to Keap today and watch your business flourish!


