How To Integrate Zoho CRM With Whatsapp
Businesses are always looking for creative methods to improve client engagement and expedite communication procedures in the digital era. Integrating customer relationship management (CRM) systems with messaging apps like WhatsApp is one effective approach that has grown in popularity.
The advantages, procedures, and tactics for using the integration to enhance client encounters and boost revenue are all covered in this thorough guide. This post will discuss how companies can maximize client interactions and increase revenue by integrating Zoho CRM with WhatsApp.
Why integrate Zoho CRM with WhatsApp?
- Improved Customer Communication: With billions of active users globally, WhatsApp is a popular messaging app. Businesses can connect with customers & enhance customer satisfaction by integrating WhatsApp with Zoho CRM. This allows for faster reaction times.
- Manage Customer Information Centrally: Zoho CRM acts as a single point of contact for all customer data, including contact information, history of transactions, and interactions. Businesses may get a basic picture of each client’s journey by unifying customer data in one location by connecting WhatsApp interactions with Zoho CRM.
- Automatic processes: Businesses may automate various communication processes by integrating Zoho CRM with WhatsApp. These workflows include sending automatic messages, initiating follow-up activities depending on customer engagements, and updating CRM data instantly.
- Personalized Customer Engagement: Companies may use the information included in Zoho CRM to tailor their WhatsApp conversations with clients. For sending relevant material, offers, and communications targeted to clients based on their prior interactions and preferences.
Steps to integrate Zoho CRM with WhatsApp
1. Navigate to Channels > Business Messaging under Setupt
2. Select Details> Integrate under WhatsApp

3. Enter your Facebook Business Manager login information on the WhatsApp access request page. To begin, click Get Started.

4. Allow all the permissions and click Continue.

5. Create a new Facebook business account or add an existing account. Click Continue.

6. Now, create a new WhatsApp business account/add an existing account. Click Continue.

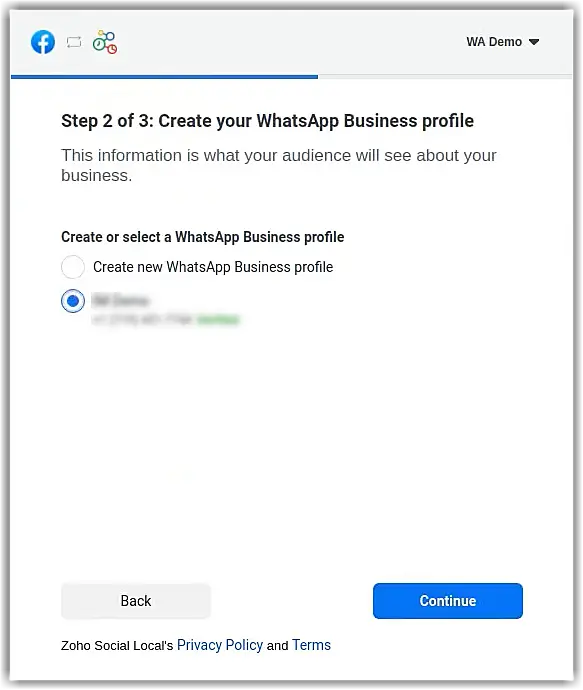
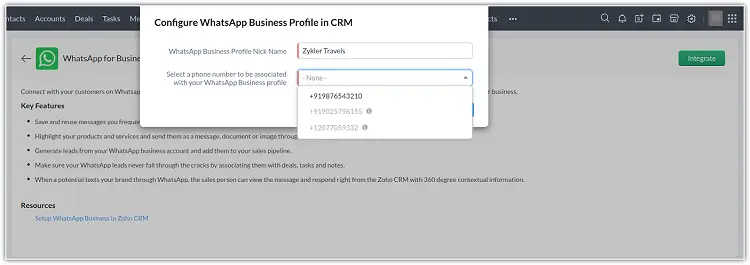
7. Create a new WhatsApp business profile or you can add an existing profile. Click continue.
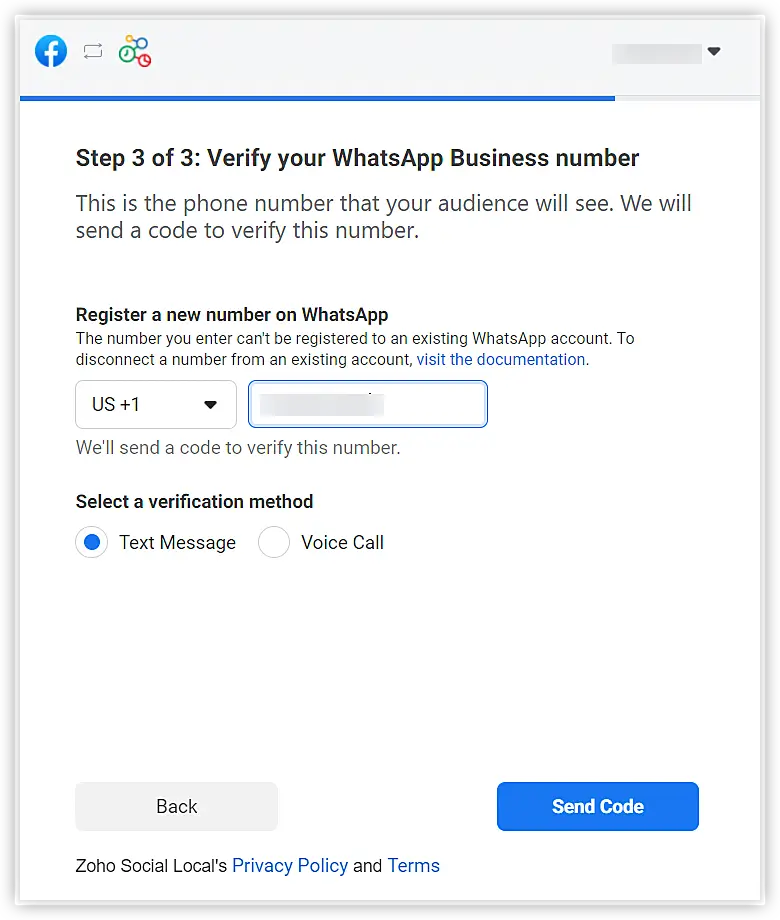
8. Verify your WhatsApp number.
9. Click OK.

10. Give a nickname to your WhatsApp business profile in CRM and click Next.
11. Choose from dropdown options for account preferences. In the Add as field, select Leads or Contacts.
12. Assign users, groups, or roles by selecting them in the Assign to the field and choosing from the options in the Choose Users field.

13. After finishing, click Save. Now your account is activated.
Managing Messaging Costs: Business Message Charges, Credit Purchases, and Auto Recharge
To manage messaging expenses, buy credits and charges will be automatically deducted. To keep a minimum balance and guarantee continuous contact, keep auto-recharge enabled. Establish thresholds to ensure seamless messaging operations by causing credit purchases when limitations are reached.
To purchase credits:
- Navigate to Setup > Channels > Business Messaging.
- Click Buy Credits (available after activating the phone number).
- Enter the desired value and click Next, then proceed to payment.
To enable auto-recharge:
- Access Setup > Channels > Business Messaging.
- Select Auto Recharge from the menu.
- Toggle on Enable Auto Recharge and specify the Minimum credit balance to be maintained.
- Set the Number of credits to be added when the balance is minimum, then click Save.
Manage Message Tab
Filter and set view for message
Users can efficiently manage their messages within the module by employing various filters and criteria:
- Arrange messages based on those not replied to within a given period (x days/weeks/months).
- Arrange messages based on those replied to within a specified timeframe (x days/weeks/months).
- Set criteria for message time within a certain time (x days/weeks/months).
- Arrange messages based on the record owner, specifying a particular user or the logged-in user.
- Arrange messages based on a specific user or the logged-in user.
- Users can set a customized view in the module to see unread messages, all messages sent today, and other specified criteria.
Notifications for Business Messages
- Zoho CRM customers receive notifications via SalesSignal and popup when a client sends a business message to your WhatsApp number, guaranteeing that the record owner responds immediately.
- To provide quick responses, users receive push alerts with the option to be reminded again in a few minutes or an hour. Every notice comes with an option for when to remind them. The notice can be closed by clicking “Ignore”. When more than one message is received, alerts also show the total number of messages received.
- Users also access message notifications from SaleSignal.
Reply on Business Messages
Users of Zoho CRM may respond to business communications by accessing records from the communications tab or immediately from alerts. Through SalesSignal alerts, they may also respond by selecting “View conversation.”
Typed text or prewritten business messages can be included in responses, and merged fields can be used to extract relevant data. Before sending messages, users can preview values.
- Click the notification or go to the Messages tab to view the message.
- Type your message or select a predefined text, then click Send.
Set and manage predefined text
Users of Zoho CRM may write pre-written messages to reply to clients quickly.
To generate a preset text:
- Navigate to the Messages tab and select a message.
- Click New Predefined Text next to the typing bar or click Manage & then + New Predefined Text.
- Enter a name and the text message, including merge fields if needed, in the popup, then click Save.
Manage predefined texts by:
- Go to the Messages tab and select Predefined Text from the text area.
- Clicking Manage from the dropdown list.
- Hover around a new text & select the Edit/Delete icon in manage predefined text.
Send attachments
Users of Zoho CRM can text up to five files from different sources as attachments.
- Upload files from their PC.
- Attach inventory files (invoices, purchase orders, quotations, and sales orders).
- Attach files from compatible cloud storage (Google Drive, Dropbox, Sky Drive, Evernote).
Each discussion view page is separated into Messages and Attachments tabs for convenient access & administration of related information. Users can choose, generate, or send quotations as needed. From any tab, you may preview and download every attachment.
Configure Custom Templates
To create a new WhatsApp template in Zoho CRM:
- Go to Setup > Automation > Actions.
- Once WhatsApp Business is integrated, locate the WhatsApp Notification tab.
- Navigate to WhatsApp Notification > WhatsApp Templates.
- Click on + New WhatsApp Template.
- In the pop-up, configure the template:
- Name: Title the template for reference.
- Module: Select the associated module.
- Language: Choose the language.
- Template Category: Utility or Marketing.
- Message content: Provide the message content, using # for merged fields.
- Click Save to finalize the template creation.

WhatsApp Notification
To create a WhatsApp notification using a custom template:
- Go to Setup > Automation > Actions.
- Navigate to WhatsApp Notification > Notifications.
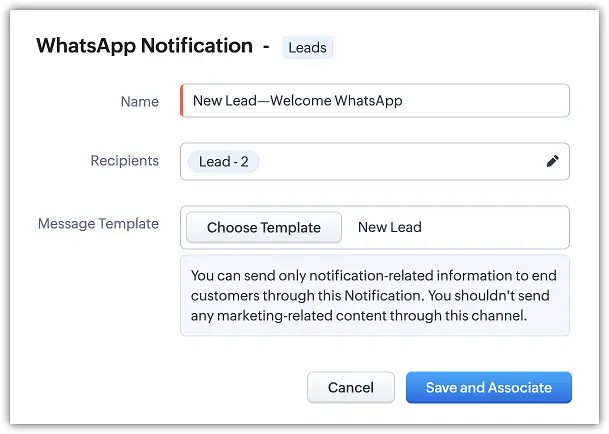
- In the pop-up, provide the following details:
- Name the notification for future reference.
- Pick the desired list module of user-oriented modules.
- Choose recipients for the WhatsApp notification.
- Choose the list template of selected templates.
- Click Save to create the notification.
Set automated notifications via WhatsApp
To set automated notifications you can use Workflow Rules, Blueprints & Command Center.
Workflow Rules
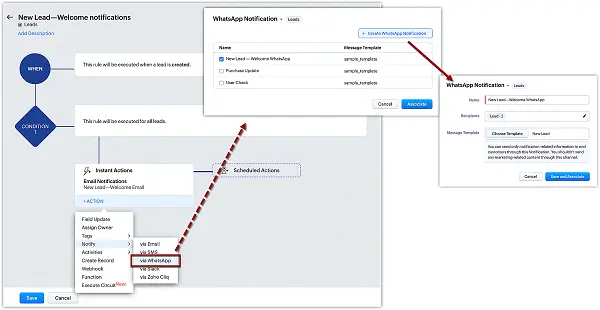
- Go to Notify > using WhatsApp to get Instant Actions.
- Create a new notice or associate with an existing one.
- Click Associate once your choice has been made.
- Click Save and Associate.
Blueprints
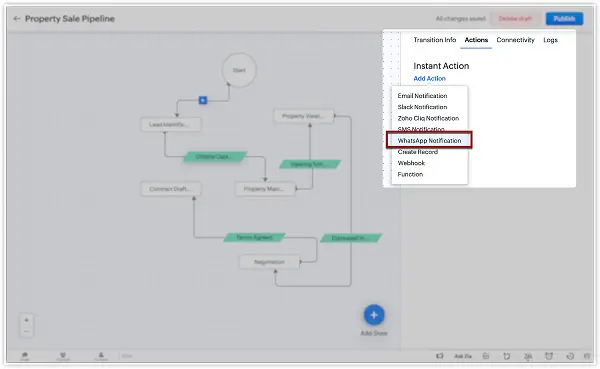
Set WhatsApp notification as an action after the transition.

Command Center
To set automated notifications from the Command center, choose WhatsApp Notification as an action in a transition.
For a complete overview, automatic notification messages will pop up in the message’s module and on the dedicated Notifications page for transactional messages when they are issued to end users.
Wrapping Up
Businesses may increase customer engagement and streamline communication procedures by integrating Zoho CRM with WhatsApp.
Businesses can use the connectivity to automate operations, customize encounters, and engage with consumers in reality to increase sales and cultivate a loyal customer base. Adopting this integration can help companies provide outstanding client experiences while staying competitive in today’s economy.


